Drilling holes for a door knob might seem simple, but using the wrong tool can lead to splintered edges, misaligned hardware, or even a ruined door. The right tool to make door knob holes ensures clean, accurate cuts that fit your lockset perfectly—without guesswork or frustration. Most standard door knobs require two holes: a 1-inch diameter hole through the face of the door for the knob or lever, and a 2 1/8-inch hole on the edge for the latch mechanism. While it’s possible to drill these freehand, doing so risks wobbling, off-center bores, or uneven finishes. The smart approach? Use purpose-built tools designed for precision. Whether you’re a DIY beginner or a seasoned contractor, this guide covers the best tools, step-by-step techniques, and pro tips to help you drill perfect door knob holes every time—safely, efficiently, and with professional results.
Choose the Right Hole Saw
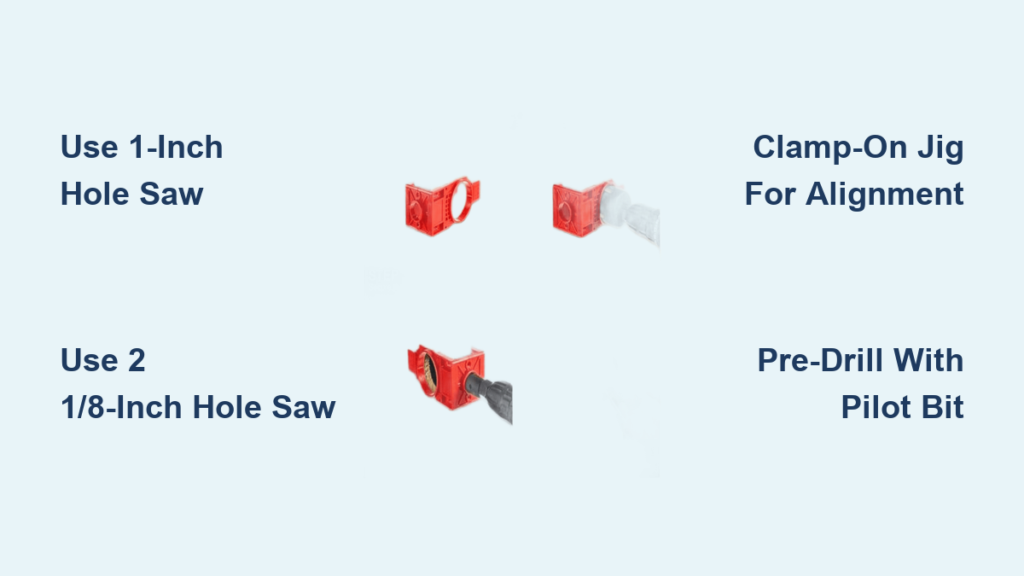
Use 1-Inch and 2 1/8-Inch Hole Saws
The most effective tool to make door knob holes is a hole saw. These circular drill bits cut clean, precise holes in wood, metal, or composite doors with minimal tear-out. For standard installations, you’ll need two sizes:
- 1-inch hole saw: Cuts the spindle hole through the door’s face.
- 2 1/8-inch hole saw: Drills the larger latch bore on the edge.
Hole saws attach to a standard drill arbor and work with any corded or cordless drill. Bi-metal models are ideal for wood doors, while high-speed steel (HSS) versions handle metal or steel-clad doors. Ensure the depth of the hole saw exceeds your door thickness—typically 1-3/8” to 1-3/4”—so you can complete the cut from both sides without binding.
Visual cue: When drilling, stop as soon as the pilot bit breaks through. Flip the door and finish from the opposite side to prevent splintering.
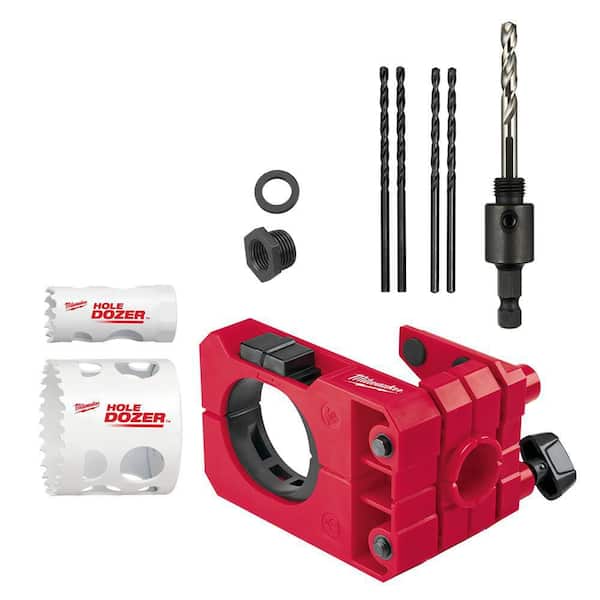
Upgrade with a Door Lock Installation Kit
Instead of buying individual bits, a complete door lock installation kit gives you everything in one box—saving time and ensuring compatibility. Top kits include:
- 1″ and 2 1/8″ hole saws
- Pilot bits
- Depth stops
- Alignment guides or jigs
- Chisels for mortising
Recommended kits:
– DEWALT D180004: Heavy-duty C-clamp design with adjustable bushings (4.6-star rating, 8,100+ reviews).
– Milwaukee 49-22-4073: Auto-centering guide and non-slip grip for flawless alignment.
– Spyder 5-Piece Rapid Core Eject Kit: Premium bi-metal construction for long life and precision.
These kits are especially valuable for multiple installations, offering consistent results and reducing setup time.
Use a Jig for Perfect Alignment
Clamp-On Jigs Prevent Drift and Misalignment
Even with a sharp hole saw, drilling freehand often leads to bit wander or crooked holes. A door knob jig clamps onto the door and guides the drill bit to ensure both holes are perfectly centered and square. Without one, you risk misaligned latches, binding knobs, or unsightly gaps.
Top-rated commercial jigs:
– DEWALT C-Clamp Jig: Durable, adjustable, fits standard door thicknesses.
– Milwaukee Auto-Centering Guide: Self-aligns to the door edge for perfect latch placement.
– Milescraft Lock Mate PLUS: Self-clamping design ideal for contractors doing multiple doors.
Pro Tip: If your clamps slip, screw the jig in place. Small pilot holes won’t damage the door and can be filled later.
Try DIY Jig Alternatives
If you don’t own a commercial jig, you can create a homemade guide for accurate drilling:
– Scrap wood block: Drill a 1″ hole in a wooden block and clamp it over your marked spot.
– Hardboard template: Cut a reusable Masonite pattern for consistent hole placement.
– L-shaped hardwood jig: Build a square guide with pre-drilled holes for repeatable accuracy.
Expert tip: Make multiple jigs for different backsets (2 3/8″ or 2 3/4″) to speed up future installations.
Drill Without a Hole Saw (Alternative Tools)
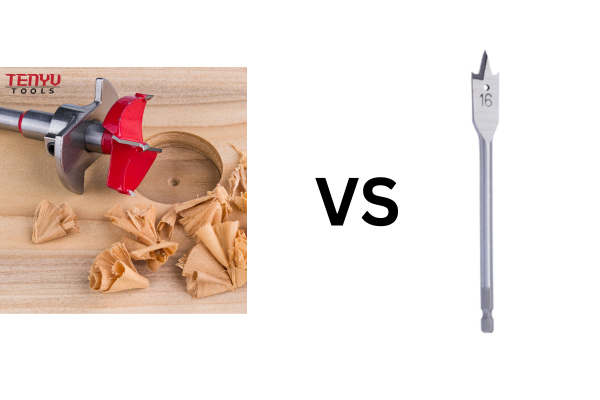
Forstner Bit for Clean, Flat-Bottomed Holes
If you don’t have a hole saw, a 1-inch Forstner bit is the next best option. It cuts smooth, flat-bottomed holes with minimal tear-out—ideal for high-end finishes. However, it’s slower than a hole saw and requires steady pressure and a perfectly perpendicular angle.
Best for: Fine woodworking or doors with delicate veneers.
Spade Bit for Fast, Budget-Friendly Cuts
A 1-inch spade bit is cheap and fast, making it a popular choice for one-off projects. But it can splinter wood if not sharp or if drilled too quickly. To reduce blowout, place a backing board behind the door and drill slowly.
Tip: Withdraw the bit frequently to clear wood chips and prevent overheating.
Bit Brace for Quiet, Controlled Drilling
For historical restorations or noise-sensitive areas, a bit brace with a 16/16″ (1-inch) bit offers excellent control. This hand-powered tool delivers consistent torque without risking kickback or splintering—perfect for older, fragile doors.
Coping Saw for No-Power Option
When power tools aren’t available:
1. Drill a small pilot hole with a twist bit.
2. Remove the coping saw blade, feed it through, and reattach.
3. Carefully saw along the marked circle.
Keep the blade vertical for a straight cut. Finish with files or sandpaper for smooth edges.
Note: This method is labor-intensive but effective for antique doors or covered hardware.
Follow the Correct Drilling Procedure
Mark Holes Accurately First
Misplaced holes are the most common mistake. To avoid errors:
– Measure backset: Standard is 2 3/8″ or 2 3/4″ from the door edge to the knob center.
– Align with strike plate: Use the jamb hardware as a reference point.
– Draw level lines: Use a carpenter’s square to transfer marks across the face and edge.
Warning: Double-check measurements—especially on older or warped doors.
Drill the Latch Hole (Edge of Door)
- Clamp the door securely in a vice or on sawhorses.
- Use a 2 1/8-inch hole saw.
- Drill from one side until the pilot bit just breaks through.
- Flip the door and finish from the other side.
Keep the drill level—tilting causes misalignment and chipping.
Drill the Knob Hole (Face of Door)
- Use a 1-inch hole saw.
- Drill straight through using a jig or guide block.
- Avoid tilting—angled cuts cause binding and poor fit.
Pro Tip: Apply masking tape over the drilling area to reduce surface tear-out on finished doors.
Mortise the Latch and Faceplate

Chisel the Recess for a Flush Fit
After drilling, the latch faceplate needs a shallow recess to sit flush with the door edge.
Steps:
1. Trace the faceplate outline with a sharp utility knife.
2. Use a chisel to remove wood in thin layers.
3. Work slowly—check fit often to avoid overcutting.
4. Smooth edges with sandpaper.
Warning: Use hand pressure only—never hammer the chisel to avoid deep gouges.
Pre-Drill Screw Holes
To prevent splitting:
– Mark screw positions on the faceplate.
– Use a 1/8-inch drill bit to pre-drill pilot holes.
– Drive screws gently—don’t over-tighten.
Test and Adjust After Installation
Check Latch and Knob Function
After mounting:
– Open and close the door several times.
– Ensure the latch retracts smoothly.
– Verify the knob turns without resistance.
– Confirm the strike plate aligns perfectly.
Fix binding: Loosen mounting screws slightly, reposition, then retighten.
Troubleshoot Common Issues
Hole Is Slightly Off-Center?
- Use an oversized faceplate cover.
- Shift the strike plate.
- File the edge of the latch hole to allow adjustment.
Splintered or Torn Wood?
- Use a backing board next time.
- Fill damage with wood filler and sand smooth.
Bit Wanders During Drilling?
- Always use a jig or guide block.
- Start with a center punch or dimple to anchor the pilot bit.
Match Tools to Your Project Type
Install on Standard Interior Doors
For hollow or solid core interior doors:
– Use a KATA or RKK installation kit ($9–$15).
– Pair with a scrap wood jig for accuracy.
– Drill at 800–1,200 RPM for clean, chip-free cuts.
Work on Metal Doors
Metal doors require special tools:
– Use bi-metal or HSS hole saws.
– Apply cutting oil to reduce heat.
– Clamp a steel backer plate behind the cut to prevent warping.
Restore Older or Antique Doors
Pre-1950s doors may have non-standard holes:
– Use a bit brace or coping saw for authenticity.
– Fill old holes with wooden plugs before redrilling.
– Use a laser level for precise alignment.
Secure Child-Safe Closets
For privacy locks with surface bolts:
– Use a 2¼-inch hole saw for the lock body.
– Drill a 1-inch latch hole and chisel a shallow recess.
– Add a surface bolt at the top for extra security.
Maintain Tools for Longevity
Clean and Store Properly
After each use:
– Wipe hole saws with a dry cloth to remove resin.
– Use a wire brush for stubborn buildup.
– Store in a protective case to prevent dulling.
Pro Tip: Soak in mineral spirits if sap clogs the teeth.
Replace Worn Components
Check for:
– Dull teeth – cause burning and rough cuts.
– Loose bushings in jigs – reduce accuracy.
– Worn pilot bits – lead to wobbling.
Sharpen or replace as needed—don’t risk poor results with damaged tools.
The best tool to make door knob holes depends on your project, but a 2 1/8-inch and 1-inch hole saw paired with a jig delivers the most reliable results. Beginners should start with an affordable kit like KATA or RKK, while professionals installing multiple doors should invest in self-clamping jigs like Milescraft or DEWALT. If you lack a hole saw, a Forstner bit or spade bit can work—but always use a guide to prevent mistakes. With proper measurement, the right tools, and careful technique, you can achieve clean, perfectly aligned door knob holes every time—saving time, materials, and frustration.