Installing a door isn’t just about hanging it on hinges—it’s about precision. A poorly mortised hinge can cause binding, misalignment, or an unprofessional finish. The best tool to cut door hinges ensures the hinge sits perfectly flush in the door edge or jamb, allowing smooth operation and seamless aesthetics. Whether you’re a DIYer tackling a single interior door or a contractor installing multiple exterior units, the right method makes all the difference.
So what’s the best way to cut a hinge mortise? There are several effective tools and techniques—each suited to different scenarios. From time-tested hand tools like chisels to modern power systems like router jigs, your ideal choice depends on your project scale, skill level, and budget. This guide breaks down every viable tool to cut door hinges, explains how to use them effectively, and helps you choose the right one for your job.
You’ll learn how to achieve clean, professional hinge pockets every time, avoid common pitfalls, and apply pro tips that save hours of rework. Let’s get into it.
Hand Chisels: The Original Precision Tool for Hinge Mortising
When power tools aren’t available—or when craftsmanship demands control—nothing beats a sharp chisel. It’s the traditional, low-tech solution that still delivers outstanding results.
Why Use a Chisel to Cut Door Hinges?
A chisel gives you complete control over depth, angle, and edge quality. With proper technique, you can create mortises indistinguishable from machine-cut ones. It requires no electricity, minimal setup, and works on any wood type—from soft pine to dense oak.
“A good worker with a chisel is as good and probably faster than one pulling out a router.”
— Professional woodworker
While it demands skill and patience, hand chiseling builds precision and confidence. It’s ideal for one-off installations or when working with antique or custom doors.
Best Chisels for Cutting Hinge Mortises
Not all chisels are created equal. For hinge work, you need sharp, durable tools with square edges.
- 1-inch (25 mm) square corner chisel – Perfect for clean right-angle cuts in standard hinge pockets.
- Mortise chisels – Heavy-duty versions designed to withstand mallet strikes.
- POWERTEC 71036 Square Corner Chisel – Spring-loaded handle, built for hammer use.
- ATLIN Corner Chisel – High-carbon steel, ideal for door and framing mortises.
Keep your chisel razor-sharp. A dull edge crushes wood fibers instead of slicing them, leading to tear-out and frustration.
Step-by-Step: How to Cut a Hinge Mortise with a Chisel
- Trace the hinge outline using a sharp utility knife—never a pencil. Score deeply along both outer and inner edges.
- Score the perimeter with the chisel to prevent splintering when removing material.
- Make parallel cuts every 3/16″ across the mortise area, about 1/16″ deep per pass.
- Tap lightly with a mallet to remove wood chips between cuts.
- Clean up the base and edges with light scraping motions.
- Test-fit the hinge frequently—it’s better to go slightly shallow and adjust than to cut too deep.
✅ Pro Tip: If you accidentally cut too deep, don’t panic. Cut a piece of cardboard to size, glue it into the mortise, and reinstall the hinge. This is a standard fix used by professionals.
Common Mistakes to Avoid
- Using a dull chisel – Causes crushing and splintering.
- Driving the chisel straight down – Can split the door edge; angle it slightly outward.
- Skipping the scoring step – Leads to ragged edges and tear-out.
⏱️ Time Estimate: 8–15 minutes per hinge
🔧 Difficulty: Moderate (requires practice and control)
Router and Hinge Mortising Jigs: Speed and Consistency
For multiple doors or high-volume jobs, a router with a hinge mortising jig is the fastest, most accurate method available.
Why Use a Router Template System?
Router jigs guide your bit to cut an exact replica of the hinge shape every time. They eliminate guesswork, ensure perfect alignment, and dramatically reduce labor—especially on large projects.
“Ten doors? Use a router.”
— Contractor advice from real-world experience
Once set up, you can cut a mortise in under five minutes with near-perfect repeatability.
Key Components of a Router Mortising System
- Adjustable template – Matches common hinge sizes (3″, 3.5″, 4″, 5″)
- Bearing-guided flush trim bit – Follows the jig edge precisely
- Depth stop – Sets cut depth to match hinge thickness
- Clamp or hand bolt – Secures the jig to the door edge
Top Hinge Mortising Jigs Compared
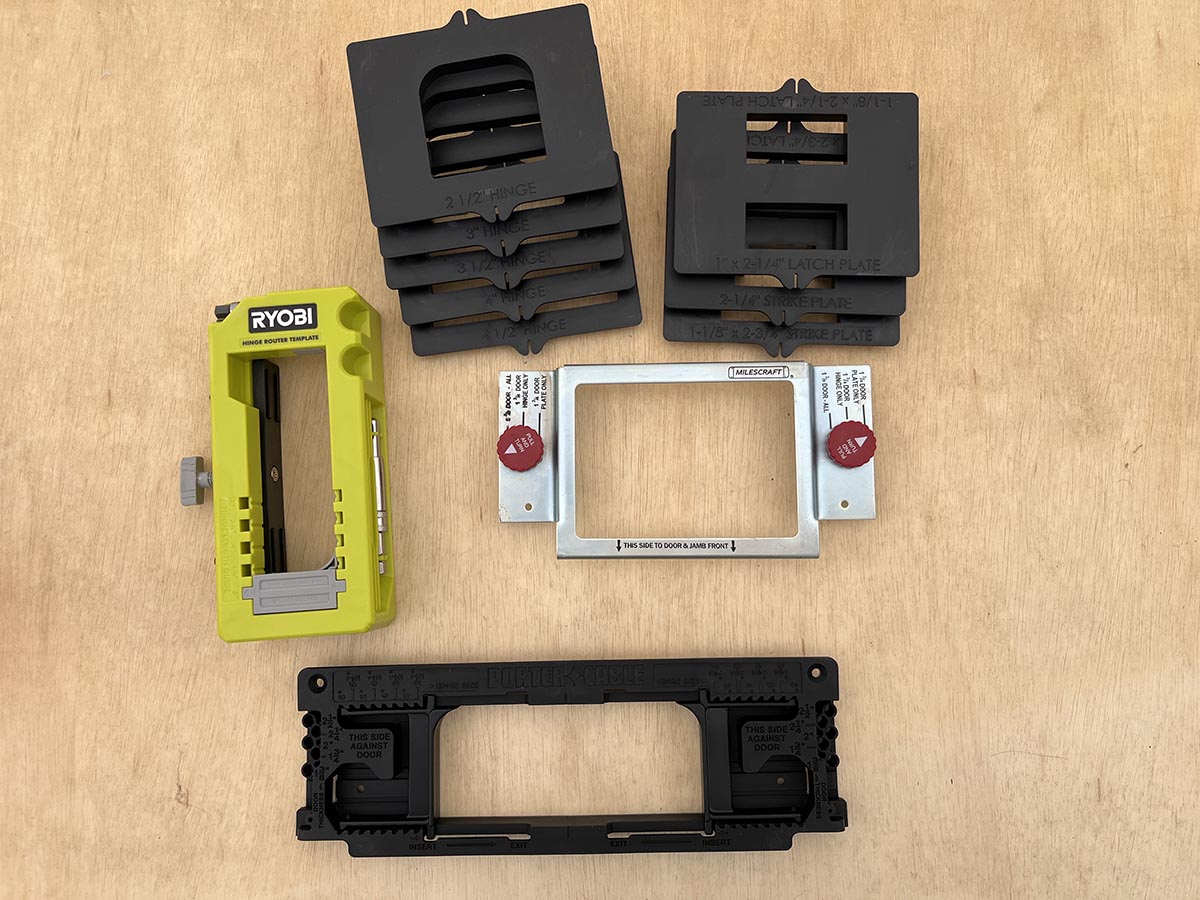
Ryobi Door Hinge Template
- Fits: 3″ to 5″ hinges
- Includes: Router bit, drill bit, hand bolt, inserts for square/radius corners
- Depth settings: 1/8″–3/16″ (thin), adjustable for thick hinges
- Best for: DIYers and pros who need reliability
Milescraft 1222 Hinge Mate 150
- Fits: 3″ and 3.5″ hinges
- Price: $17.99
- Rating: 4.5/5 (2,100+ reviews)
- Simple clamp design—great starter jig
Milescraft 1226 Hinge Jig
- Fits: 2.5″ to 4.5″ hinges
- Self-clamping mechanism
- Includes latch plate templates
- Price: $27.99
Milescraft 1229 Hinge Jig PLUS
- Dual clamping system
- Complete kit with strike and latch plates
- Best for full door hardware installs
- Price: $49.99
DUEBEL Aluminum Jig
- Fits: 2.5″–5″
- Includes hole opener and lock jig
- Durable construction
- Price: $39.99
How to Use a Router Hinge Jig (Step-by-Step)
- Set the hinge size using adjustment screws on the template.
- Choose corner insert (square or radius) to match your hinge style.
- Align the jig with the door edge—use alignment marks for accuracy.
- Secure with clamp or hand bolt—zero movement during routing.
- Install a 1/4″ shank flush-trim router bit with a bearing guide.
- Set depth to match hinge thickness (start at 1/8″, test fit).
- Turn on router, let it reach full speed before contact.
- Guide router clockwise around the template—let the bearing do the work.
- Remove template, test hinge fit, and adjust if needed.
✅ Pro Tips:
– Pre-drill screw holes to prevent splitting.
– Never force the router—feed at a steady, controlled pace.
– Clean sawdust from the jig after each use to maintain accuracy.
⏱️ Time Estimate: 3–5 minutes per hinge
🔧 Difficulty: Easy to moderate (once set up)
Concealed Hinge Jigs: For Cabinet and Frameless Doors

If you’re installing 35mm cup hinges (common in kitchen cabinets), you need a different approach.
Kreg KHI-Hinge Concealed Hinge Jig
- Most popular on the market (4.7/5 from 7,500+ reviews)
- Fits standard 3/4″ cabinet doors
- Adjustable depth for different hinge types
- Includes Forstner bit and drilling guide
- Quick-clamp system
Other Options
- Yakamoz 35mm Hinge Jig – Budget-friendly ($11.99), includes carbide Forstner bit
- GOINGMAKE Metal Jig – Premium build, dust vacuum adapter, 4.7/5 rating
- Generic 35mm Drilling Jig – $9.99, basic but functional
How It Works
- Clamp jig to door face.
- Adjust depth to match hinge cup.
- Drill 35mm hole using included Forstner bit.
- Install hinge and attach to cabinet frame.
⏱️ Time per hinge: Under 2 minutes
🔧 Best for: Kitchen remodels, cabinet shops
Utility Knives: The Secret to Clean Layouts
Before cutting—by hand or power tool—you must mark the hinge outline accurately.
Why a Knife Beats a Pencil
Pencil lines blur and can lead to misalignment. A sharp utility knife scores a crisp, precise line that prevents tear-out and guides your chisel or router.
“Use a sharp knife instead of a pencil. A knife creates a clean, sharp line.”
— Pro tip from experienced installers
Recommended Utility Knives
- IVY Classic 11154 Hinge-Loc Fixed Blade – $7.04, 4.7/5
- WORKPRO 2-in-1 Folding Knife – $15.63, 4.6/5 (includes 10 blades)
How to Score a Hinge Line
- Place hinge on door edge.
- Hold firmly and run the knife along the outer and inner edges.
- Cut deeply enough to define the mortise boundary.
- Use this groove as your guide when chiseling or routing.
✅ Pro Tip: Always score before removing material—this prevents wood fibers from lifting.
Vix Bits: Perfect Screw Hole Alignment
Even with a perfect mortise, misaligned screw holes can ruin your work—especially in hardwood.
What Is a Vix Bit?
A Vix bit is a self-centering drill bit that aligns perfectly with hinge screw holes. It ensures screws go in straight, without stripping or splitting.
How to Use It
- Position hinge in mortise.
- Insert Vix bit into drill.
- Drill pilot holes directly through hinge screw slots.
- Remove hinge and complete mortise if needed.
- Reinstall and drive screws.
✅ Best for: Hardwoods, antique doors, or any job where precision matters
Fixing Common Hinge Installation Problems
Even with the right tool to cut door hinges, mistakes happen.
Mortise Too Deep?
- Solution: Cut a cardboard shim to fit behind the hinge.
- Glue or nail in place, then reinstall hinge.
- This is a standard professional repair—no shame in it.
Hinge Not Flush?
- Re-chisel lightly to deepen or widen mortise.
- Test fit after each pass.
- Use a flat block and hammer to tap hinge into place for testing.
Screw Holes Misaligned?
- Use a Vix bit to re-drill accurately.
- Or fill old holes with wood epoxy and re-drill.
Door Sagging?
- Use a knuckle bender (e.g., FastCap Knuckle Bender, $20.73).
- Compress hinge knuckles to lift door slightly.
- Often includes built-in hinge pin remover.
Final Tips for Flawless Hinge Installation
- Always mark with a knife—not a pencil.
- Test fit early and often—remove material gradually.
- Use sharp tools—dull chisels or router bits cause tear-out.
- Pre-drill screw holes—especially in hardwoods.
- Let the tool do the work—don’t force routers or chisels.
- Clean your jig regularly—sawdust affects accuracy.
- Shim if overcut—cardboard is a pro-approved fix.
“A well-cut mortise isn’t just about fit—it’s about craftsmanship.”
Bottom Line: The best tool to cut door hinges depends on your needs.
– For control and simplicity: Use a sharp chisel and utility knife.
– For speed and consistency: Go with a router and hinge jig like the Milescraft 1222 or Ryobi template.
– For cabinets: Invest in a 35mm concealed hinge jig like the Kreg KHI-Hinge.
Master the technique, pick the right tool, and your doors will look professionally installed—every time.