You’re building a shelf, pricing hardwood for a dining table, or assessing timber on your property. No matter your project, knowing how to measure wood accurately is the foundation of success. But here’s the catch: there’s no single way to measure wood. The method changes depending on whether you’re working with dimensional lumber at the hardware store, buying rough-sawn hardwood, stacking firewood, or estimating the value of standing trees.
How do you measure wood? The answer depends on context—construction, woodworking, or forestry—each with its own units, tools, and rules. Confusing a “2×4” with its actual size can throw off your cuts. Buying hardwood without calculating board feet can lead to costly overruns. And if you’re selling timber, misunderstanding log scaling means leaving money on the table.
This guide breaks down every essential method—from decoding nominal vs. actual lumber sizes to measuring tree diameter, calculating board feet, and making precision cuts—so you can avoid common mistakes and work with confidence.
Why Dimensional Lumber Isn’t the Size It Says
When you pick up a “2×4” at the lumberyard, don’t trust the label. What’s printed is the nominal size, not the real dimensions. After the wood is dried and planed smooth, it shrinks—leaving you with a smaller actual size.
How Milling Changes Wood Dimensions
At the sawmill, logs are first cut into rough boards. These are then air-dried or kiln-dried, which removes moisture and causes shrinkage. Finally, the boards are planed on all sides to remove splinters and create uniform surfaces. This process removes more material, resulting in the final, smaller dimensions.
Key Example: A “2×4″ starts as a rough 2″x4” board but ends up 1.5 inches thick by 3.5 inches wide after processing.
Lengths, however, stay true. A “2x4x10” is exactly 10 feet (120 inches) long.
Common Dimensional Lumber Sizes (Actual vs. Nominal)
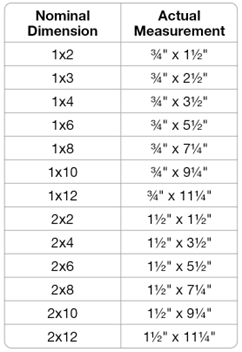
| Nominal Size | Actual Size (inches) |
|---|---|
| 1×2 | 0.75 × 1.5 |
| 1×4 | 0.75 × 3.5 |
| 1×6 | 0.75 × 5.5 |
| 2×4 | 1.5 × 3.5 |
| 2×6 | 1.5 × 5.5 |
| 2×8 | 1.5 × 7.25 |
| 4×4 | 3.5 × 3.5 |
Pro Tip: Always use actual dimensions when designing furniture, cabinetry, or framing. Relying on nominal sizes leads to misaligned joints and gaps.
How Hardwood Thickness Works: The Quarter System Explained
Unlike softwoods, hardwoods like oak, walnut, and cherry aren’t sold by fixed sizes. Instead, they use the quarter system, where thickness is measured in quarter-inch increments.
Decoding 4/4, 8/4, and Beyond
- 4/4 = “four-quarter” = 1 inch thick (nominal)
- 8/4 = “eight-quarter” = 2 inches thick
- 12/4 = 3 inches thick
After planing, hardwood loses about 1/4 inch in thickness:
– A 4/4 board measures 0.75″ thick finished
– An 8/4 board becomes 1.75″
Quick Math: Divide the numerator by the denominator. 16/4 = 4 inches nominal thickness.
What S1S and S2S Mean on Hardwood Orders
- S1S: Surfaced on one side
- S2S: Surfaced on two sides
An S2S 4/4 board is ready for final use and typically cleans up to 0.75″. Always confirm surfacing when ordering—unfinished boards require more milling time.
Historical Note: The quarter system originated when sawmills adjusted blade depth in 1/4″ steps. Four cuts equaled one inch—hence 4/4.
Calculate Board Feet: The True Cost of Hardwood
When buying hardwood, you’re not paying per foot—you’re paying per board foot (BF), a unit of volume.
What Is One Board Foot?
One board foot equals 144 cubic inches of wood—exactly 1″ thick × 12″ wide × 12″ long. It doesn’t matter if the board is wide and short or narrow and long; if the volume is 144 in³, it’s one BF.
Board Foot Formula
[
\text{Board Feet} = \frac{\text{Thickness (in)} \times \text{Width (in)} \times \text{Length (in)}}{144}
]
Example: A 1″ × 8″ × 10′ (120″) board:
[
\frac{1 \times 8 \times 120}{144} = 6.66\ \text{BF} ≈ 7\ \text{BF (rounded)}
]
Most lumberyards round to the nearest whole number.
Avoid Overspending: Buy Smart
- Add 25% extra for waste, warping, and matching grain.
- Hardwood boards vary in color and figure—buy all at once for consistency.
- Use a board foot calculator app to total your project’s needs before purchasing.
Pro Tip: Sketch your build and list each part’s dimensions. Convert everything to BF first.
How to Measure Firewood: Understanding the Cord
Firewood isn’t sold by length or weight—it’s measured in cords, a unit of stacked volume.
What Is a Standard Cord?
One cord = 4 ft high × 4 ft wide × 8 ft long = 128 cubic feet of stacked wood. But this includes air gaps—actual wood content is about 85 ft³.
Important: A cord is defined by how it’s stacked, not just volume. Loose, unstacked wood (“thrown cord”) contains up to 30% more air.
Cord Variations You Should Know
- Face cord: Same height and length, but shorter depth (e.g., 16″ instead of 48″)
- Long cord: 5 ft wide × 4 ft high × 8 ft long = 160 ft³
- Short cord: Smaller stacks, often with 1–2 ft logs
Always confirm the stack dimensions before buying.
How to Calculate Cords
[
\text{Cords} = \frac{\text{Length (ft)} \times \text{Width (ft)} \times \text{Height (ft)}}{128}
]
Example: A stack 10 ft long × 6 ft wide × 3 ft high:
[
\frac{10 \times 6 \times 3}{128} = 1.4\ \text{cords}
]Warning: Never buy unstacked firewood by volume—insist on a stacked measurement.
Measure Standing Trees: Diameter and Merchantable Height
For landowners and foresters, assessing tree value starts with two key measurements: diameter at breast height (d.b.h.) and merchantable height.
How to Measure d.b.h. Correctly

- Measure 4.5 feet above ground on the uphill side of the tree.
- Avoid areas with bumps, roots, or damage.
Tools You Need
- Diameter tape (D-tape): Wrapped around the trunk, calibrated in diameter units (using π ≈ 3.14). Every 3.14″ = 1″ diameter.
- Cruising stick: Held 25″ from your eye. Uses geometry to estimate diameter.
For odd trunks: Measure twice (perpendicular) and average the results.
Determining Merchantable Height
This is the usable length from a 6-inch stump to the minimum top diameter:
– Sawlogs: Usually 8″ inside bark
– Cordwood: As small as 4″ inside bark
– Limited by forks, disease, or decay
Height Measurement Tools
- Cruising stick (height side): Marked in 16-foot log segments. Count how many “logs” fit up the trunk.
- Clinometer or laser rangefinder: For precise, professional surveys.
Pro Tip: If you’re less than 50 ft from the tree, pace twice the distance and double your reading.
Scale Logs for Board Foot Yield: What Your Lumber Will Produce

Before logs go to the mill, they’re scaled to estimate how many board feet they’ll yield.
Steps to Scale a Log
-
Measure small-end diameter (inside bark)
– To the nearest inch
– For oval logs: average two perpendicular measurements -
Measure length
– To the nearest even foot (8′, 10′, 12′)
– Round down if between even feet (e.g., 15’7″ → 14′)
– Allow ~3″ for trimming -
Apply a log rule using a scaling stick or volume table
Comparing Log Rules
| Rule | Accuracy | Notes |
|---|---|---|
| International 1/4″ Rule | Most accurate | Accounts for taper and saw kerf |
| Doyle Rule | Underestimates small logs | Simple, widely used |
Example: A 12″ × 10′ log yields:
– 55 BF (International)
– 41 BF (Doyle)Caution: Log rules assume perfect wood. Deduct for knots, rot, or sweep.
Use Tree Volume Tables to Estimate Timber Value
Instead of scaling each log, foresters use tree volume tables to estimate total board feet in standing trees.
How to Use a Volume Table
You need:
– d.b.h. (inches)
– Merchantable height (in 16-ft logs)
Example: A tree with 18″ d.b.h. and 2.5 logs (40 ft) contains 221 board feet (International Rule).
Key Point: Use tree tables for standing trees and log rules for cut logs—they give different results.
Pro Tip: Download mobile apps with built-in volume calculators for field use.
Mark and Measure for Precision Woodworking Cuts
Accuracy begins with how you mark your cuts.
Best Practices for Layout
- Double-check every measurement
- Use a sharp pencil or razor blade for fine lines
- A razor blade cuts reduce tear-out and improve alignment
Three Marking Strategies
| Method | When to Use | Risk |
|---|---|---|
| Cut to the outside | General use | Leaves extra for sanding |
| Cut on the line | Joinery, tight fits | Requires perfect blade alignment |
| Cut to the inside | Dados, rabbets | Easy to undershoot |
Recommendation: Always cut to the outside of the line unless precision joinery demands otherwise.
Use a Square to Ensure Accuracy
- Check edges are straight
- Verify 90° angles before cutting
- Align blade with mark—never rely on the saw’s fence alone
Warning: Never skip layout. A misplaced cut wastes time and material.
Master Essential Woodworking Cuts and Tools
Each type of cut serves a purpose—and requires the right tool and measurement approach.
Crosscut: Cut Across the Grain
- Best Tool: Miter saw
- Avoid: Band saw (can burn edges)
- Tip: Use stop blocks for repeat cuts
Rip Cut: Cut Along the Grain
- Best Tool: Table saw with rip fence
- Safety: Use a push stick—never hand-feed
- Measure: Set fence to final width, not blade to mark
Resawing: Slice Thick Boards Thin
- Best Tool: Band saw
- Finish: Run through planer for smooth faces
- Mark: Label thickness and grain direction
Miter and Bevel Cuts
- Miter: Angled cut across face (e.g., 45° for frames)
- Bevel: Angled cut through edge (blade tilts)
- Blade Tip: Tilt away from fence to avoid kickback
Curved Cuts
- Best Tool: Band saw
- Alternative: Jigsaw (for thin stock)
- Method: Cut to outside of line, then sand to shape
Safety First: Always use guards, push sticks, and clamps. Never bypass safety features.
Summary: Key Takeaways and Best Practices
Measuring wood correctly saves time, money, and frustration—whether you’re building a shelf or managing a forest.
Critical Distinctions
| Concept | Key Point |
|---|---|
| Nominal vs. Actual | A 2×4 is 1.5″ x 3.5″ |
| Softwood vs. Hardwood | Softwoods sold by size; hardwoods by board feet |
| Board Foot | 144 cubic inches = 1 BF |
| Cord | 128 ft³ stack = 1 cord |
| Scaling vs. Tallying | Scaling estimates yield; tallying counts BF |
Top 5 Best Practices
- Use actual dimensions in project plans
- Convert to board feet early when buying hardwood
- Buy 20–30% extra for waste and matching
- Measure d.b.h. and merchantable height for timber value
- Always double-check before cutting
Essential Tools List
| Tool | Purpose |
|---|---|
| Tape Measure | General sizing |
| D-tape | Tree diameter |
| Cruising Stick | Field estimates |
| Scaling Stick | Log BF yield |
| Calculator | Board feet, cords |
| Square | Accurate marking |
| Razor Blade | Fine layout lines |
| Push Stick | Safe rip cuts |
Final Note: Whether you’re framing a deck, crafting a table, or selling timber, knowing how do you measure wood is the key to precision and value. Use the right method for your material—dimensional lumber, hardwood, logs, or firewood—and always verify with the right tool. Now that you know the rules, you’re ready to measure like a pro.