If you’ve ever stood in a workshop or walked through a hardware store wondering, “What’s that tool called?”—you’re not alone. Whether you’re a beginner DIYer, a student learning carpentry, or someone refreshing their knowledge, knowing carpenter tools by name and picture is the foundation of every successful woodworking project. This guide delivers a clear, visual-friendly breakdown of essential carpentry tools—complete with descriptions, real-world uses, and key visual identifiers so you can confidently match each tool to its image.
From driving nails to shaping edges, measuring accurately to holding wood in place, each tool has a purpose. We’ll cover hand tools, power tools, measuring devices, clamps, and safety gear—everything from the humble claw hammer to the precision-focused jointer plane. By the end, you’ll be able to identify every major carpentry tool at a glance and understand exactly what it does.
Hammers: Driving and Demolishing with Force
Claw Hammer – The Carpenter’s Go-To Tool
The claw hammer is the most recognizable tool in any toolbox. Designed for both driving nails and removing them, it features a flat steel striking face on one side and a curved claw on the back. Weighing between 16 and 20 ounces, it’s ideal for framing, trim work, and general construction.
Visual ID: A metal head with a smooth striking surface and a V-shaped claw; attached to a wooden, fiberglass, or composite handle.
✅ Pro Tip: When pulling nails, use a pry motion close to the surface to avoid splitting the wood—never yank sideways.
Sledgehammer – For Heavy-Duty Demolition
When you need brute force—like tearing down walls or driving fence posts—the sledgehammer is your tool. It has a long handle (typically 30–36 inches) and a heavy head (8–20 lbs), allowing two-handed swings for maximum impact.
Visual ID: Large rectangular steel head on a long wooden or fiberglass shaft.
Rubber Mallet – Gentle Yet Effective
Used to tap joints together or drive chisels without damaging wood, the rubber mallet delivers controlled force. Its soft face protects delicate surfaces during assembly.
Visual ID: Cylindrical head made of rubber or plastic, mounted on a short handle—often in bright colors like red or blue.
Screwdrivers and Drivers: Fastening with Precision
Flathead vs. Phillips – Know Your Tip
Flathead screwdrivers fit slotted screws and are common in older fixtures. Phillips (crosshead) screwdrivers are more modern and resist slipping under pressure, making them better for power tools.
Visual ID: Long metal shaft ending in a flat blade (flathead) or a cross-shaped tip (Phillips).
🔧 Other Types: Torx (star-shaped), Allen (hex), and Pozidriv heads are used in specialized applications.
Impact Driver – High-Torque Powerhouse
Compact yet powerful, the impact driver is designed to drive long screws, lag bolts, and deck screws quickly. It delivers rotational hammering action, reducing wrist strain.
Visual ID: Pistol-shaped body with a hexagonal bit holder—smaller and lighter than a drill.
Chisels: Precision Cutting for Joinery
Bevel-Edge Chisel – All-Purpose Shaping
Used for cleaning joints, trimming tenons, or carving, the bevel-edge chisel has tapered sides that let it fit into tight corners. It’s struck with a mallet for deeper cuts.
Visual ID: Steel blade with a beveled edge and a sturdy wooden or plastic handle.
Mortise Chisel – Built for Tough Jobs
Designed for chopping mortises (square holes), this chisel has a thick, rigid blade to withstand repeated mallet strikes.
Visual ID: Wider, heavier blade with a robust handle—clearly sturdier than a standard chisel.
Paring Chisel – For Delicate Work
The paring chisel has a long blade and is pushed by hand (not struck) for fine, controlled cuts like smoothing dovetails.
Visual ID: Long, slender blade with a smooth handle—used like a knife.
✅ Keep It Sharp: All chisels must be honed regularly on a whetstone for clean, precise cuts.
Planes: Smoothing and Flattening Wood
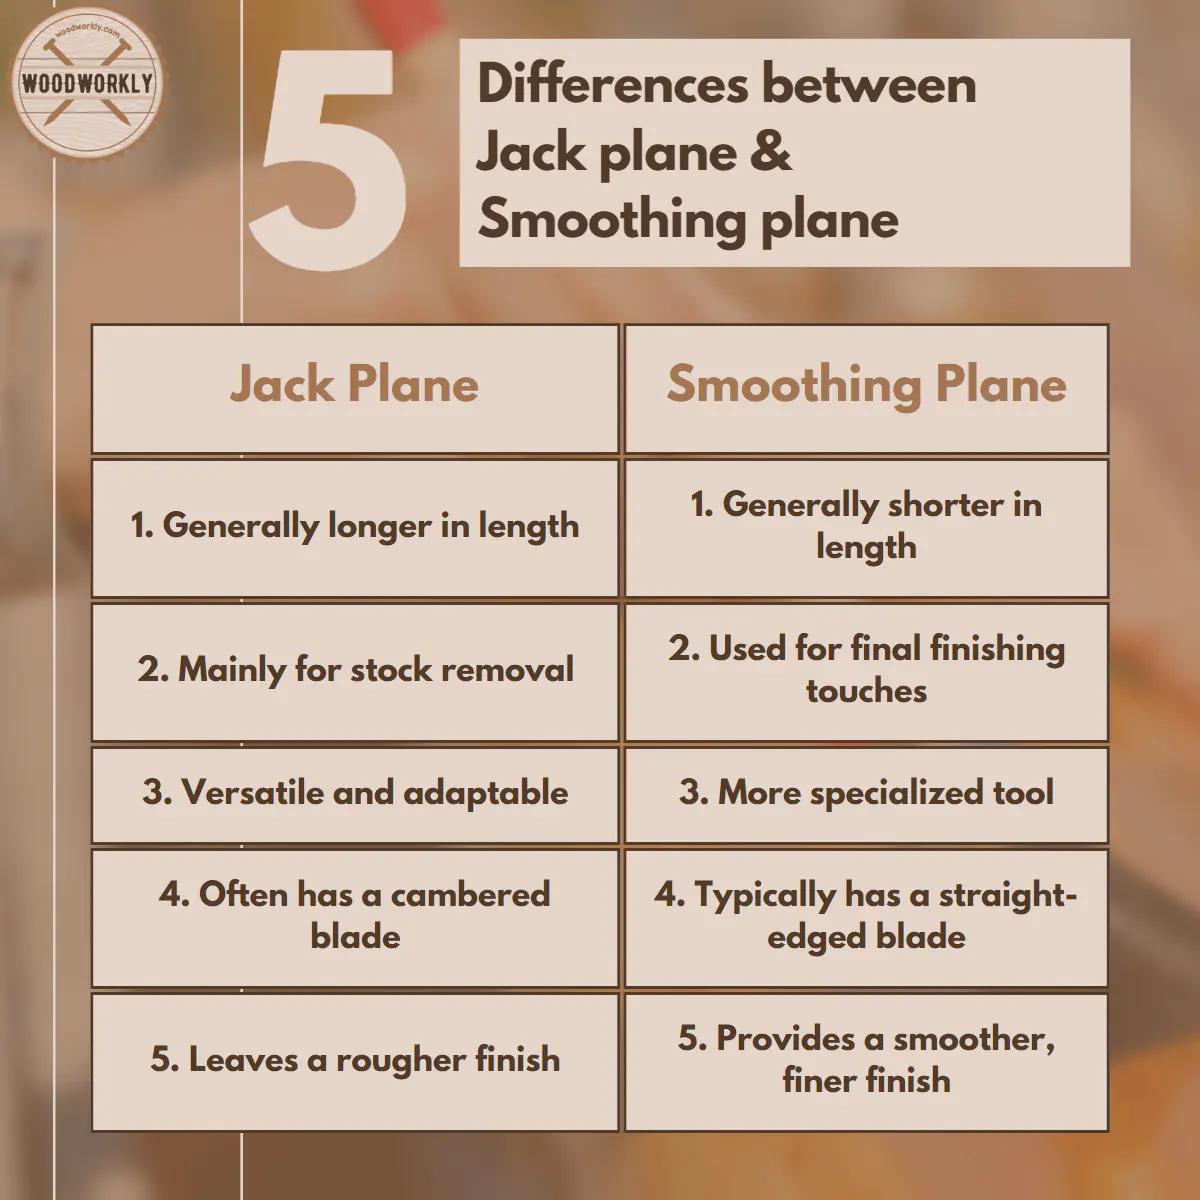
Jack Plane – First Pass Smoothing
The jack plane (No. 4) is used for initial stock removal and surface leveling. It removes material faster than finer planes.
Visual ID: Medium-length metal body with an adjustable blade, depth knob, and front knob/handle.
Smoothing Plane – Final Surface Prep
After the jack plane, the smoothing plane (No. 3) takes ultra-thin shavings to create a glass-like finish before sanding.
Visual ID: Shorter than a jack plane—used with light, even pressure.
Jointer Plane – Straighten Long Edges
The jointer plane (No. 7 or 8) is long (22–30 inches) and used to flatten and straighten board edges for seamless joints.
Visual ID: Long sole with two handles—one at the front, one at the back.
Block Plane – Trim End Grain Like a Pro
Small and low-angle, the block plane excels at trimming end grain, chamfering edges, or light smoothing.
Visual ID: Compact size, one-handed use, blade set at a shallow angle.
Measuring and Layout Tools: Accuracy Starts Here
Tape Measure – The Essential Ruler
No carpenter works without a tape measure. Most are 25 feet long, retractable, and marked in 1/16-inch increments.
Visual ID: Steel tape inside a plastic or metal case with a movable metal hook.
🔍 Look For: Red markings every 16 inches—standard stud spacing in framing.
Combination Square – Mark 90° and 45° Lines
This versatile tool combines a ruler with interchangeable heads for marking perpendicular and diagonal lines.
Visual ID: Metal rule sliding through an L-shaped head with 90° and 45° edges.
Speed Square – Fast Framing Layout
A speed square is a triangular metal tool used to mark rafters, stairs, and angled cuts quickly.
Visual ID: Right-angled triangle with degree notches along the longest edge.
Level – Check Level and Plumb
A spirit level uses bubble vials to show when a surface is horizontal (level) or vertical (plumb).
Types:
– Torpedo level (6–12″): Fits in tight spaces.
– 48-inch level: For walls, countertops, and long runs.
Visual ID: Aluminum or plastic bar with one or more liquid-filled vials.
Saws: Cutting Wood with Control
Handsaw – Basic Manual Cutting
A handsaw has a toothed blade for cutting wood by hand. Types include:
– Crosscut saw: Cuts across the grain.
– Rip saw: Cuts along the grain.
Visual ID: Long blade with coarse teeth and a D-shaped handle.
Back Saw – Precision Joinery
Back saws have a stiffening rib (brass or steel) on the back for straight, accurate cuts in fine woodworking.
Types:
– Tenon saw: For cutting tenons.
– Dovetail saw: Smaller, finer teeth for dovetail joints.
Visual ID: Shorter blade with a metal spine along the top.
Coping Saw – Cut Curves and Scrolls
Used for internal curves and intricate shapes, the coping saw has a thin, removable blade.
Visual ID: U-shaped frame with a fine blade stretched between ends.
Circular Saw – Power for Straight Cuts
The circular saw uses a 7¼-inch blade to make fast, straight cuts in lumber and plywood.
Visual ID: Pistol grip with a round blade guard and depth adjustment lever.
✅ Use With a Guide: Clamp a straight edge for perfect rip cuts.
Table Saw – Ultimate Precision
The table saw is the heart of any woodshop. It excels at ripping boards and making repeatable crosscuts.
Visual ID: Flat tabletop with a circular blade rising from the center, rip fence, and miter gauge.
⚠️ Safety First: Always use a riving knife and blade guard.
Miter Saw – Perfect Angled Cuts
Ideal for crown molding, frames, and trim, the miter saw makes precise angled crosscuts.
Types:
– Compound miter saw: Tilts for bevel cuts.
– Sliding miter saw: Extends for wider boards.
Visual ID: Blade mounted on a pivoting arm over a base with angle scales.
Power Tools: Efficiency and Precision

Cordless Drill – Drill Holes and Drive Screws
The cordless drill/driver is a must-have. It bores holes and drives screws with variable speed and clutch settings.
Visual ID: Pistol-shaped tool with a keyless chuck at the front.
🔋 Battery Tip: 18V or 20V max batteries offer the best balance of power and runtime.
Drill Press – Accurate, Repeatable Drilling
A drill press ensures perfectly perpendicular holes at consistent depths.
Visual ID: Stationary base with a table and vertical drill head.
Jigsaw – Cut Curves and Shapes
The jigsaw uses a reciprocating blade to cut curves, circles, and irregular shapes.
Visual ID: Narrow blade protruding from a base plate, with a top handle.
🔁 Orbital Setting: Increases cut speed in softwood.
Router – Shape Edges and Cut Joints
A router carves decorative edges, cuts grooves, and creates joints like dadoes and rabbets.
Types:
– Plunge router: Starts cuts in the middle of a board.
– Fixed-base router: Best for edge work.
Visual ID: Circular base with a spinning bit in the center.
🌀 Common Bits: Roundover, chamfer, ogee, and straight bits.
Sanders – From Rough to Smooth
Random Orbital Sander – Swirl-Free Finish
Moves in tiny circles and random orbits to leave no visible marks.
Visual ID: Round pad with dust collection port or bag.
Belt Sander – Aggressive Material Removal
Uses a continuous sanding belt to level surfaces fast.
Visual ID: Rectangular base with a moving belt—often requires two hands.
Disc Sander – Edge Smoothing
Spins a circular sanding disc for smoothing edges or small curves.
Visual ID: Stationary or handheld tool with a flat, spinning disc.
Clamps: Hold It Together

C-Clamp – Classic Holding Power
Uses a screw to close a C-shaped frame around materials.
Visual ID: Metal C-shape with a threaded screw on one end.
🛑 Protect Wood: Use scrap wood pads to avoid clamp marks.
Bar Clamp – Long Reach for Panels
Ideal for gluing large panels, the bar clamp (or F-clamp) has a long steel bar.
Visual ID: Two jaws connected by a long bar with a handle.
Pipe Clamp – Adjustable and Affordable
Uses standard threaded pipe as the bar—customizable and cost-effective.
Visual ID: Clamp heads that attach to a metal pipe.
Corner Clamp – Perfect 90° Joints
Holds two pieces at a right angle for glue-ups.
Visual ID: L-shaped body with adjustable arms.
Fastening and Marking Tools
Nail Gun – Fast, Consistent Nailing
Drives nails with air or battery power.
Types:
– Framing nailer: For structural work.
– Finish nailer: For trim.
– Brad nailer: For delicate work.
Visual ID: Gun-shaped tool with a magazine and safety tip.
⚠️ Always disconnect when not in use.
Carpenter Pencil – Won’t Roll Away
Flat, rectangular shape prevents rolling. Thick lead draws bold, visible lines.
Visual ID: Wide wooden body with a thick graphite core.
Chalk Line – Long Straight Marks
Snaps a taut string coated in chalk to mark long, straight lines.
Visual ID: Plastic reel with colored string (red, blue, white).
Safety Gear: Protect Yourself
Safety Goggles – Eye Protection
Prevents injury from flying chips and dust.
Visual ID: Clear, wraparound plastic shield.
Dust Mask and Respirator – Breathe Safely
Filters wood particles. Use a HEPA respirator when sanding MDF.
Visual ID: Disposable mask or reusable half-face respirator.
Ear Protection – Prevent Hearing Loss
Saws and sanders are loud—use earmuffs or earplugs.
Visual ID: Foam earplugs or padded earmuffs.
Beginner’s Tool Kit Checklist
Start with these 10 essentials:
- Claw Hammer (16 oz)
- Tape Measure (25 ft)
- Combination Square
- Level (24″ or 48″)
- Circular Saw or Handsaw
- Cordless Drill/Driver
- Screwdriver Set
- Utility Knife
- Clamps (2–4)
- Safety Gear (goggles, mask, ear protection)
🛠️ Next Upgrades: Table saw, miter saw, router, planer.
Summary: Carpenter Tools at a Glance
| Tool | Visual Clue | Main Use |
|---|---|---|
| Claw Hammer | Flat face + curved claw | Drive/remove nails |
| Tape Measure | Retractable steel tape | Measure length |
| Combination Square | Adjustable ruler with L-head | Mark 90° lines |
| Level | Bubble vial in metal bar | Check level/plumb |
| Chisel | Steel blade + wooden handle | Carve joints |
| Circular Saw | Handheld with round blade | Straight cuts |
| Drill | Pistol grip + chuck | Drill holes, drive screws |
| Speed Square | Triangular metal tool | Mark roof angles |
| Clamp | Screw-adjusted C or F shape | Hold wood for gluing |
| Router | Base with spinning bit | Shape edges, cut grooves |
🖼️ Tip: Use online tool ID charts, labeled diagrams, or flashcards to practice matching carpenter tools name with picture.
Knowing your tools is the first step to mastering carpentry. With this guide, you can confidently identify each tool by sight and understand its role in the workshop—whether you’re starting a project, building your toolkit, or studying for a test.