Every successful carpentry project starts with knowing your tools. Whether you’re building a bookshelf, installing trim, or tackling a full renovation, understanding the carpenter tools name and image is essential for efficiency, accuracy, and safety. This guide gives you a clear, visual-based overview of every major tool used in woodworking—what it looks like, what it does, and how to recognize it at a glance. From hand tools to power machines and safety gear, you’ll gain the confidence to identify and use each one correctly.
No more guessing which tool does what. With real-world descriptions and easy-to-spot visual cues, this guide turns tool confusion into clarity—perfect for beginners, DIYers, or anyone setting up their first workshop.
Hand Tools Every Carpenter Must Know
These manual tools form the backbone of traditional woodworking. Lightweight, reliable, and requiring no power, they offer unmatched control for detailed tasks.
Claw Hammer: The Iconic Nailing Tool
The claw hammer is every carpenter’s go-to for driving and removing nails. It features a flat striking face on one side and a forked claw on the other. Most models weigh between 16 oz and 20 oz, with a 12–15 inch handle made of fiberglass or wood. The curved claw allows you to grip and pry nails efficiently.
Visual ID: Look for a dual-function steel head and a brightly colored handle—often yellow or orange. The claw’s V-shape is unmistakable.
Pro Tip: Grip the end of the handle to maximize swing force and reduce wrist strain.
Screwdrivers: Match the Screw Head
Screwdrivers come in two primary types: flathead (slotted) with a single straight blade, and Phillips (crosshead) with a star-shaped tip (PH1, PH2). Precision sets include smaller tips for electronics or cabinetry.
Visual ID: Long metal shaft ending in a shaped tip, with a thick rubberized grip. Color-coded handles often indicate size.
Use Case: Installing hinges, door hardware, or electrical fixtures where power tools aren’t needed.
Chisels: Precision Wood Shaping
Chisels are used to carve joints, trim door hinges, or clean out mortises. Made of hardened steel with a sharp beveled edge, they come in widths like 1/4″, 1/2″, and 1″. The handle is usually wood or plastic, sometimes with a metal collar to prevent splitting.
Visual ID: Blade tapers to a sharp edge; some have a striking cap on the handle end for mallet use.
Expert Note: Always chisel with the grain to avoid splitting the wood.
Hand Saws: Cut Wood Without Noise
When silence or portability matters, hand saws are ideal. The tenon saw has a rigid steel back for straight cuts in joinery. The coping saw features a U-shaped frame with a thin, replaceable blade for curves. Ripsaws cut along the grain with fewer teeth per inch, while crosscut saws slice across the grain cleanly.
Visual ID: Tenon saw has a brass spine; coping saw resembles a bow with a taut blade.
Planes: Smooth and Flatten Wood
A hand plane removes thin shavings to create flat, smooth surfaces. The jack plane (No. 4) is the most versatile for general use. Smoothing planes (No. 3) refine surfaces, while block planes are compact and perfect for end grain.
Visual ID: Cast iron body with an adjustable blade; knob on top and lever at the front.
Pro Tip: Adjust the blade so it barely protrudes—this ensures fine, controlled shavings.
Spokeshave: Shape Curves with Control
This small, two-handled tool works like a mini-plane. It’s designed for shaping chair legs, handles, or any curved surface. The blade is recessed and adjustable.
Visual ID: Flat or rounded sole with a depth knob between the side handles.
Wooden Mallet: Gentle but Effective Force
Used with chisels or when assembling tight joints, a wooden mallet delivers impact without damaging tool heads. Beech or maple is common. Rubber mallets are softer, ideal for knocking panels into place.
Visual ID: Hexagonal or cylindrical head; shorter handle (10–12″) than a hammer.
Sanding Block: Even Pressure, Better Finish
A sanding block holds sandpaper flat, ensuring even pressure and preventing finger fatigue. Made from cork, wood, or foam, it’s essential for hand sanding.
Visual ID: Rectangular shape (~3″x5″); may have grooves to reduce dust buildup.
Files and Rasps: Shape Wood by Hand
Files have fine, diagonal or crisscrossed teeth for smoothing and precision shaping. Rasps have raised, individual teeth for aggressive stock removal.
Profiles: Flat, half-round, round, square.
Grades: Coarse (rasp), medium, fine (file).
Key Difference: Files cut smoothly; rasps remove material quickly—like a cheese grater versus a knife.
Measuring and Layout Tools for Accuracy
Precision begins with measurement. These tools ensure every cut and joint is exact.
Tape Measure: The Carpenter’s Constant Companion
A 16-foot tape measure is standard. The steel blade retracts into a durable case, and the hook end moves slightly to account for its own thickness—ensuring accurate inside and outside measurements.
Visual ID: Yellow or black casing; blade locks when extended. Marked in 1/16″, 1/32″, and metric.
User Tip: Hook the end and pull tight—don’t let it wobble.
Spirit Level: Check Level and Plumb
A spirit level uses liquid-filled vials with air bubbles. When the bubble is centered, the surface is level (horizontal) or plumb (vertical).
Types:
– Torpedo level (9–12″): Fits in tight spaces.
– 4-foot level: For long surfaces like walls.
Visual ID: Aluminum body with clear vials; some have magnetic edges.
Combination Square: Mark 90° and 45° Lines
This tool combines a steel rule (12″ or 24″) with a sliding head. It’s used to mark perpendicular lines, check squareness, and scribe parallel cuts.
Features: Built-in level, scribe pin, and locking knob.
Use Case: Laying out joints or verifying corner accuracy.
Try Square: Verify Right Angles
A try square has a fixed steel blade at 90° to a wooden or metal stock. It’s used to check if joints are perfectly square.
Visual ID: Rigid L-shape; no moving parts.
Marking Gauge: Scribe Parallel Lines
Used in fine joinery, it draws lines parallel to an edge. An adjustable fence holds a sharp scriber or cutting wheel.
Use Case: Marking mortise depth or tenon shoulders.
Bevel Gauge: Copy Any Angle
Adjust the blade to match an existing angle—like a roof pitch—then transfer it to your workpiece.
Visual ID: Sliding blade held by a wing nut; wooden or plastic handle.
Protractor: Measure Angles Precisely
Analog or digital, this tool reads angles exactly. Digital versions are ideal for stair building or complex joints.
Visual ID: Semi-circular body with a rotating arm; digital models have an LCD screen.
Power Tools That Speed Up Work
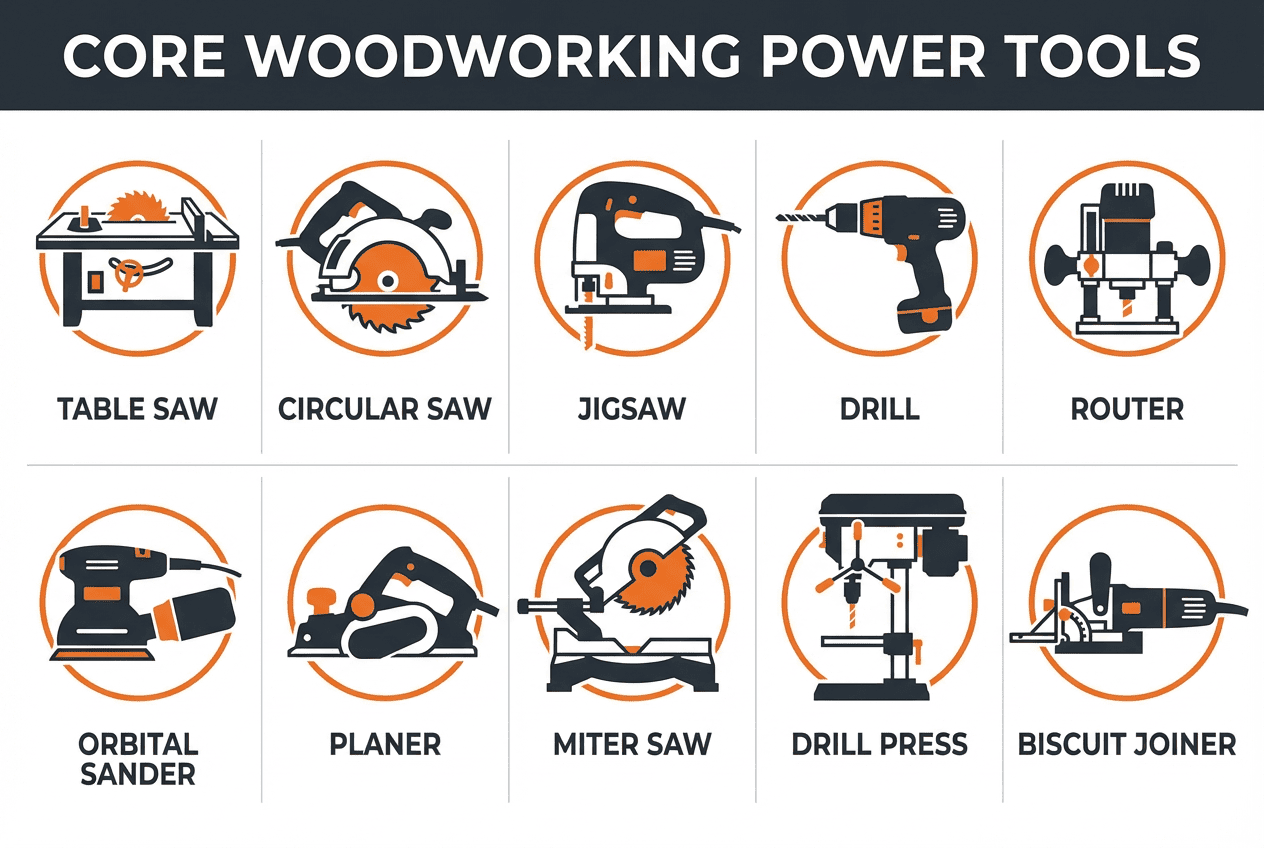
These tools bring speed, consistency, and precision to large or repetitive jobs.
Circular Saw: Fast Straight Cuts
With a 7¼” blade, the circular saw cuts lumber and plywood quickly. Adjustable depth and bevel settings allow angled cuts.
Use Case: Framing, decking, or breaking down sheet goods.
Pro Tip: Clamp a straightedge to guide the saw for perfect cuts.
Drill / Driver: Bore Holes and Drive Screws
Available corded or cordless (18V/20V), it features a keyless chuck (1/2″), variable speed, and often a hammer function.
Use Case: Drilling pilot holes, installing screws, countersinking.
Impact Driver: High-Torque Fastening
Compact and powerful, the impact driver delivers bursts of force—ideal for long screws or lag bolts.
Bit Type: 1/4″ hex shank.
Visual ID: Shorter and lighter than a drill.
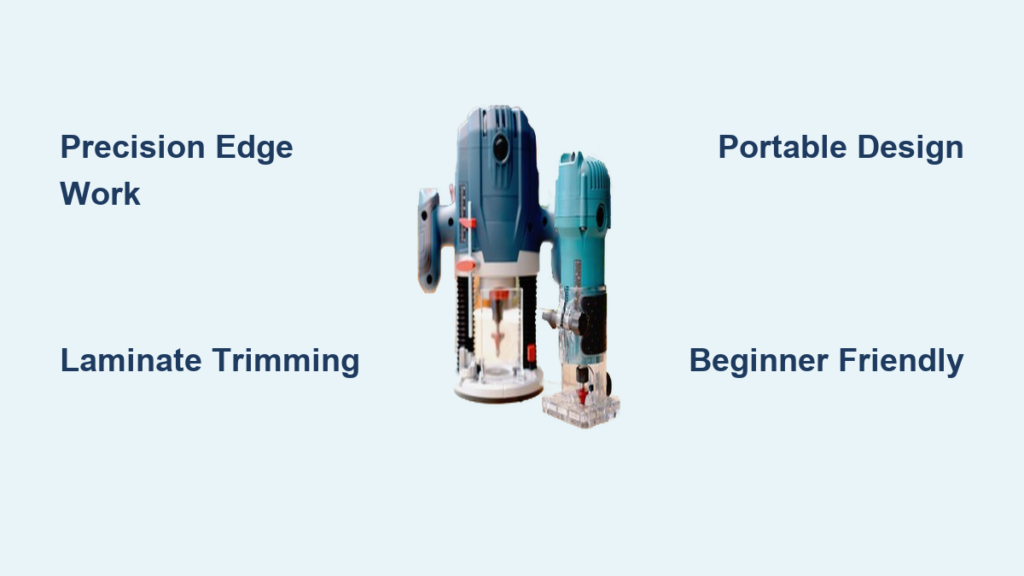
Router: Shape Edges and Cut Joints
Used for decorative edges, grooves, or joinery. Plunge routers make internal cuts; fixed-base models offer consistent edge profiles.
Common Bits: Roundover, chamfer, rabbeting, dovetail.
Collet Sizes: 1/4″ and 1/2″.
Table Saw: Precision Rip and Crosscuts
The table saw’s flat surface and adjustable blade make it ideal for accurate, repeatable cuts. A 10″ blade is standard.
Key Parts: Rip fence, miter gauge, blade guard.
Safety First: Always use a push stick and keep the blade guard on.
Miter Saw: Cut Angles for Trim
Rotates left and right for miter cuts. Compound models tilt the blade for bevels. Sliding versions cut wider boards.
Blade Sizes: 10″ or 12″.
Use Case: Crown molding, door casings.
Random Orbital Sander: Swirl-Free Finishing
Moves in a random orbit to prevent swirl marks. Comes with dust collection.
Pad Size: 5″ or 6″.
Use Case: Final sanding before staining.
Jigsaw: Cut Curves and Shapes
Blade moves up and down. Variable speed and orbital settings help with different materials.
Use Case: Sink holes, scrollwork.
Band Saw: Resaw Thick Stock
Uses a continuous loop blade to cut curves or resaw lumber into thinner boards.
Throat Capacity: 14″ is common.
Use Case: Veneers, intricate curves.
Fastening and Assembly Tools
These tools hold or join materials securely.
Nail Gun: Drive Nails in Seconds
Types:
– Framing nailer: 2–3½” nails.
– Finish nailer: 1–2½” nails for trim.
– Brad nailer: 5/8″–2″ thin nails.
Visual ID: Gun-shaped with a nose, trigger, and magazine.
Pro Tip: Use a brad nailer for delicate moldings to avoid splitting.
Clamps: Hold Workpieces Firmly
Types:
– Bar clamp: Long reach.
– C-clamp: Strong grip.
– Pipe clamp: Adjustable length.
– Spring clamp: Quick hold.
Use Case: Glue-ups, joint assembly.
Safety and Support Equipment

Protect yourself and organize your workspace.
Safety Glasses: Essential Eye Protection
Polycarbonate lenses block chips and dust. Wraparound styles protect side vision.
Rule: Wear always when cutting or sanding.
Work Gloves: Prevent Injuries
Use padded gloves for hammering, cut-resistant ones for sheet materials.
Warning: Never wear loose gloves near rotating tools.
Dust Mask and Respirator
- N95: Basic sawdust protection.
- P100 respirator: Best for fine dust.
Use When: Sanding, routing, or working with MDF.
Hearing Protection
Power tools exceed 100 dB—earplugs or earmuffs are essential above 85 dB.
Workbench: Your Central Hub
Hardwood top with front and tail vises. Include dog holes for clamping.
Tool Storage: Stay Organized
Use pegboards, racks, or tool chests. Label zones and use shadow outlines.
Pro Tip: Trace tool shapes so missing items are obvious.
Beginner’s Starter Kit: 10 Must-Have Tools
| Tool | Why You Need It |
|---|---|
| Claw Hammer (16 oz) | Nailing and prying |
| Tape Measure (16 ft) | Accurate measuring |
| Combination Square | Layout and alignment |
| Circular Saw | Fast straight cuts |
| Cordless Drill/Driver | Drilling and driving |
| Level (2 ft) | Check level and plumb |
| Safety Glasses | Eye protection |
| Work Gloves | Hand safety |
| Clamps (2–4) | Hold pieces during glue-up |
| Orbital Sander | Smooth surfaces |
Pro Tip: Master these first, then expand as needed.
Final Tips for New Carpenters
- Start Simple: Build shelves before furniture.
- Measure Twice, Cut Once: Prevent waste.
- Maintain Tools: Sharpen blades, clean parts.
- Practice on Scrap: Test techniques first.
- Prioritize Safety: Wear protection, unplug tools when changing bits.
- Learn from Mistakes: Every project teaches something new.
Knowing the carpenter tools name and image isn’t just about memorization—it’s about recognizing function, safety, and application. With this guide, you now have a complete visual and practical reference to identify, use, and organize every essential tool. Whether you’re starting your first project or teaching others, this knowledge is the foundation of every successful build.