Your weed trimmer sits silent when you pull the cord, while weeds continue growing unchecked across your property. You’re not alone—nearly 70% of homeowners face weed trimmer problems during peak growing season. When your weed trimmer not working situation strikes at the worst possible moment, knowing exactly what’s wrong and how to fix it saves time, money, and frustration. This guide reveals the five most common reasons your trimmer won’t start and provides step-by-step solutions you can implement immediately, even if you’ve never worked on outdoor power equipment before.
Fuel System Failures Causing Your Weed Trimmer Not to Work
Old or contaminated fuel remains the #1 reason why your weed trimmer not working properly. Two-stroke engines require precise fuel-to-oil ratios, and gasoline degrades surprisingly fast—losing effectiveness in just 30 days. When stale fuel clogs your system, you’ll notice sputtering, poor performance, or complete failure to start.
How to Diagnose and Fix Fuel-Related Problems
Start by checking your fuel’s age—anything older than 30 days likely needs replacement. Drain old fuel into an approved container (never pour down drains or on soil). Mix fresh fuel at the manufacturer’s specified ratio (typically 50:1 for modern trimmers). While refueling, inspect the fuel cap’s vent hole—if blocked, pressure can’t equalize and fuel won’t flow properly.
Common fuel mistakes to avoid:
– Using ethanol-blended gasoline above E10 (causes rubber component deterioration)
– Storing mixed fuel for more than 30 days
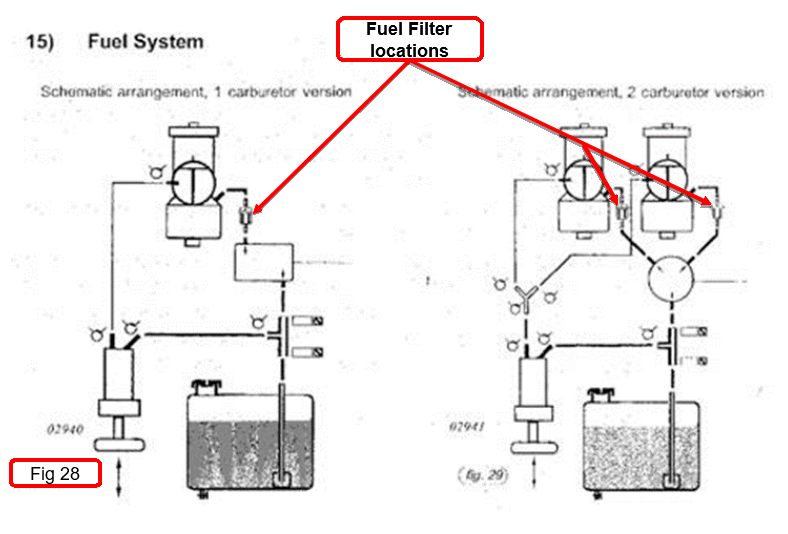
– Ignoring the fuel filter sitting in your tank’s bottom (replace annually)
– Overfilling the tank past the marked line (causes flooding)
If your trimmer still won’t start after fresh fuel, remove and clean the carburetor. Locate the carburetor (usually under a cover near the engine), disconnect fuel lines, and remove mounting screws. Soak all metal components in carburetor cleaner for 15 minutes, then use a fine wire to clear all passages. Reassemble carefully—most issues resolve with this simple $5 fix.
Ignition System Issues Preventing Your Trimmer from Starting
When you pull the starter cord but hear no spark, your ignition system has failed. Modern weed trimmers rely on three critical components working together: spark plug, ignition coil, and kill switch. Any failure in this chain stops your engine cold.
Testing and Repairing Ignition Components
Begin with the spark plug—it’s the easiest to check and most frequently problematic. Remove the plug using a 5/8″ spark plug socket, then reconnect it to the spark plug wire and ground it against the engine block. Pull the starter cord while watching for a blue spark between electrodes. No spark means either a fouled plug or ignition system failure.
Spark plug troubleshooting flow:
1. Check for carbon buildup (clean with wire brush)
2. Measure gap with feeler gauge (typically 0.020-0.025″)
3. Inspect for cracked porcelain (requires replacement)
4. Verify proper seating (hand-tight plus 1/8 turn)
If the plug appears good but shows no spark, test the ignition coil. Disconnect the kill switch wire from the coil (usually a single black wire) to rule out a shorted switch. If the trimmer starts with the wire disconnected, replace the kill switch. For persistent no-spark conditions, use a multimeter to test coil resistance—primary windings should read 0.5-2.0 ohms, secondary windings 2,500-5,000 ohms.
Airflow Problems That Stop Your Weed Trimmer from Running

Your engine needs the perfect air-to-fuel ratio to run properly. Restricted airflow causes rich mixtures that prevent starting or create uneven running. Most homeowners overlook these simple airflow issues when their weed trimmer not working situation develops.
Cleaning and Maintaining Proper Airflow
Begin with the air filter—remove and inspect it (foam filters can be washed with soapy water and oil; paper filters require replacement). Next, check the air intake vents around the engine housing—these tiny openings clog with grass clippings and dust. Use compressed air or a soft brush to clear debris from these vents.
Critical airflow components to inspect:
– Air filter (replace every 25 hours or annually)
– Crankcase breather tube (clear any blockages)
– Muffler screen (remove and clean carbon buildup)
– Cooling fins on cylinder head (keep clear for proper heat dissipation)
If your trimmer starts but stalls immediately, the carburetor’s idle mixture screw may need adjustment. Turn the screw clockwise to lean the mixture (less fuel), counterclockwise to richen it. Make 1/4-turn adjustments while the engine runs until it idles smoothly.
Mechanical Failures That Disable Your Trimmer Engine
Internal mechanical problems cause distinctive symptoms that help diagnose issues without complete engine disassembly. Understanding these mechanical failure signs prevents unnecessary part replacements.
Identifying and Fixing Common Mechanical Issues
Listen carefully when pulling the starter cord—normal operation should feel consistent throughout the pull. A sudden “clunk” or binding indicates possible piston seizure or connecting rod failure. Remove the spark plug and pull the cord again—if resistance disappears, compression loss has occurred.
Key mechanical components to check:
– Flywheel key: Shears during sudden blade stops (causes timing issues)
– Piston rings: Wear causes compression loss (requires rebuild kit)
– Reed valve: Cracks cause poor running (visible upon carburetor removal)
– Crankshaft bearings: Excessive play requires professional repair
For compression testing, use a $15 gauge screwed into the spark plug hole. Healthy two-stroke engines show 90-120 PSI. Below 80 PSI indicates significant wear requiring top-end rebuild. Before disassembling, check the simple things first—90% of “mechanical” issues turn out to be fuel or spark problems.
Preventative Maintenance That Keeps Your Trimmer Working
The best fix for a weed trimmer not working is preventing problems before they occur. Implement these maintenance practices to avoid 80% of common trimmer failures.
Essential Monthly Maintenance Routine
After each use: wipe down the trimmer, clean debris from cooling fins, and check for loose fasteners. Monthly during season: replace air filter, inspect spark plug, and lubricate drive shaft. At season’s end: drain all fuel, run engine dry, and store in a dry place with the spark plug removed and cylinder coated with oil.
Seasonal storage checklist:
– Drain fuel system completely or use fuel stabilizer
– Remove and coat spark plug hole with oil
– Clean debris from under cutting head
– Store with battery removed (for electric models)
– Hang vertically to prevent fuel leaks
When to Call a Professional Instead of DIY Repair
Some issues require specialized tools and expertise that make professional repair more cost-effective than DIY attempts. Recognize these situations where your time is better spent elsewhere.
Cost-Effective Repair Decisions
If your trimmer requires piston replacement, crankshaft work, or electrical system overhaul, compare repair costs against replacement value. For trimmers older than 5 years, replacement often makes more financial sense. Electric models with motor or battery issues typically warrant professional assessment due to warranty considerations and component complexity.
Red flags for professional service:
– Persistent compression loss after top-end rebuild
– Crankshaft wobble exceeding 0.005 inches
– Electrical issues in brushless motor systems
– Warranty-covered problems (don’t void your coverage)
Final Note: Most weed trimmer not working situations resolve with simple fuel system cleaning, spark plug replacement, or air filter maintenance. By following these diagnostic steps in order—from simplest to most complex—you’ll solve 90% of starting problems in under 30 minutes. Remember to implement the preventative maintenance schedule to avoid future headaches, and always consult your specific model’s manual for torque specifications and unique features. Keep this guide handy for your next trimmer troubleshooting session, and reclaim your weekends from equipment failures.
Leave a Reply