
Wood routers transform basic lumber into stunning craftsmanship with edges that flow like liquid and joints that fit together like puzzle pieces. If you’ve ever admired the elegant profile on a cabinet door or the precise grooves in a bookshelf, you’ve seen the magic a router can create. This powerful tool sits at the heart of professional woodworking shops because it handles tasks no other tool can perform as efficiently. Whether you’re building your first coffee table or crafting intricate moldings for a custom home project, knowing how to use a wood router tool properly unlocks a world of precision and creativity. In this guide, you’ll discover the exact techniques professionals use to achieve clean, professional cuts every time you fire up your router.
Before diving into operation, understanding what happens under the hood helps you work smarter and safer. Routers spin cutting bits at 10,000-30,000 RPM, allowing those sharp edges to slice through wood fibers cleanly rather than tearing them. This incredible speed means technique matters—proper feed direction and depth control separate smooth, professional results from tear-out and burning. The good news is that mastering router operation follows clear principles anyone can learn with proper guidance. By the time you finish this guide, you’ll approach every routing task with the confidence of a seasoned woodworker.
Essential Router Components Explained

Every router shares key components that work together to transform raw wood into finished pieces, and understanding these parts gives you greater control over your results.
Motor Power and Rotation
The electric motor drives everything, spinning the router bit at extremely high RPM to make clean cuts possible. This high-speed rotation lets the cutting edges make many small cuts per second, producing smooth surfaces with minimal tear-out compared to slower tools. More powerful motors handle deeper cuts and harder woods, while smaller routers work well for light-duty edge profiling and detail work. The motor’s rotation direction matters critically for your cutting technique—most routers spin clockwise when viewed from above, though specialized models may spin the opposite direction.
Depth Adjustment System
Precise depth control separates amateur results from professional work, and modern routers provide mechanisms to set exactly how far the bit extends below the base plate. Most routers feature a depth adjustment lever or dial that raises and lowers the motor assembly, with many including fine-tuning knobs for minute adjustments on precision jobs. The depth stop locks your setting in place so each pass maintains consistent penetration. For deep cuts, taking multiple shallow passes produces cleaner results and puts less strain on both the tool and the operator.
Handles and Control Points
Router handles position your hands for maximum control and stability during operation. Most designs feature dual handles that enable a two-handed grip, giving you commanding control over the tool’s movement and direction. Adjustment knobs near the depth mechanism let you make fine tweaks while the tool runs or lock settings firmly in place. Keeping a firm but relaxed grip—hands tense enough for control, loose enough for sensitivity—helps you feel how the bit is cutting and respond appropriately to changes in wood density or grain patterns.
Choose the Right Router Bit
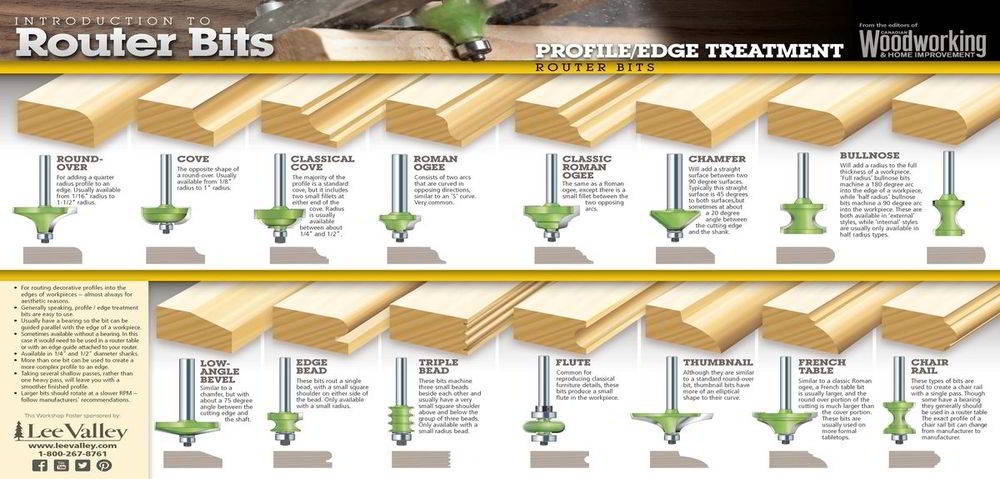
Bit selection fundamentally determines what you can create, making this choice one of the most important decisions in any routing project. Each bit profile produces a specific cut, so matching the bit to your application sets you up for success before you even turn on the tool.
Straight bits carve linear grooves and channels, while edge-forming bits like round-over, chamfer, and ogee bits add decorative profiles to tabletops, shelves, and cabinet doors. Cove bits create concave curves, and dovetail bits produce the interlocking joints prized in fine furniture making. The shaft diameter must match your router’s collet—typically 1/4 inch or 1/2 inch for common routers. Beyond basic compatibility, invest in quality bits made from high-speed steel or carbide, which maintain sharp edges longer and produce cleaner cuts that justify their higher upfront cost.
Consider your wood type and project requirements when selecting bits. Harder woods demand sharper, more durable bits, while softwoods work well with standard options. For intricate detail work, smaller bits with shorter cutting lengths provide greater precision, while larger bits handle heavy material removal efficiently. Matching the bit to both your material and your intended outcome prevents frustration and wasted material.
Install Router Bits Correctly
Proper bit installation prevents accidents and ensures clean, accurate cuts. Before touching any bit, completely disconnect the router from its power source—this non-negotiable step prevents startup accidents that cause severe injuries.
Insert the bit shank into the collet, pushing it to the proper depth. Most manufacturers recommend at least three-quarters of the shank length inside the collet for maximum stability and minimum wobble. Use the appropriate wrench to tighten the collet nut firmly, securing the bit without over-tightening. Over-tightening damages the collet and makes future bit changes difficult, while under-tightening allows the bit to slip during operation, creating dangerous conditions and poor cut quality. The bit should feel rock-solid when you test it by hand—no movement, no rotation independent of the motor shaft.
Set Precise Cut Depth
Depth precision separates clean cuts from tear-out and burning, so take time to set this correctly before each operation. Locate your router’s depth adjustment mechanism, typically involving a release lever, motor assembly movement, and a lock that holds your setting in place.
Many routers include a fine-tuning dial or screw for minute adjustments after you set the coarse depth, enabling exact penetration for precision work. For deeper cuts, calculate multiple passes—removing approximately 1/8 inch per pass works well for most situations, with harder woods requiring even shallower cuts. Test your depth setting on scrap wood matching your actual workpiece before committing to your final piece. This quick test reveals whether your setting produces the desired result and prevents costly mistakes on expensive materials.
Secure Wood for Routing
:max_bytes(150000):strip_icc()/WD322267-9b23959de45542bb95314d587583cec8.jpg)
Movement in your workpiece ruins accuracy and creates safety hazards, making proper workholding essential for successful routing. Use clamps with appropriate pads or blocks to hold wood firmly in position, placing clamps where they won’t interfere with your routing path or hand placement.
For edge routing, a router table provides exceptional stability and allows controlled workpiece feeding past the bit. Freehand routing or template work requires a stable support surface that prevents shifting during cuts. The effort spent securing your workpiece pays dividends in consistent results and eliminates frustration from uneven cuts caused by movement. When your wood stays exactly where you position it, you can focus entirely on guiding the router rather than fighting unstable material.
Master Feed Direction Rules
The golden rule of router operation: always move against the bit’s rotation. If your router spins clockwise, push the router forward. If it spins counterclockwise, pull it toward you. This counter-rotation feeding keeps the cutting edges engaging wood in a way that produces clean surfaces and maintains tool control.
Feeding with the rotation causes the bit to grab and pull the router unexpectedly, potentially leading to loss of control, uneven cuts, or dangerous kickback. Before beginning any cut, confirm your router’s rotation direction by briefly turning it on (away from wood) and observing the spin. Then plan your movement accordingly. This simple habit separates experienced router users from those who struggle with control and quality issues.
Execute Your First Cut
With preparations complete, you’re ready to make your cut. Position the router with the bit just above the wood surface, away from your cutting line, then turn on the tool and let the bit reach full speed before engaging the material.
Lower the bit to your preset depth and begin moving along your intended cutting line, maintaining steady feed pressure that lets the bit cut cleanly without straining the motor. Move smoothly and continuously—hesitating causes burning and uneven cuts. Keep the router base flat against the wood surface throughout the pass, and complete the entire cut in one continuous motion. When you reach the end, lift the bit out of the wood before turning off the router. This sequence prevents the bit from grabbing as it decelerates while still engaged in material.
Avoid Costly Router Mistakes
Even experienced woodworkers make routing errors, but understanding common mistakes helps you avoid them entirely.
Skipping safety gear invites injury—wood chips and dust shoot from the cutting area at dangerous velocities, and router noise damages hearing over extended exposure. Always wear safety glasses and hearing protection, and consider a dust mask for health protection during prolonged routing sessions.
Forcing the router through cuts damages both tool and workpiece. Let the bit do the cutting work while you simply guide the tool along its path. If resistance increases significantly, you’re likely feeding too fast, taking too deep a cut, or encountering difficult grain that requires multiple passes or a sharper bit.
Starting or stopping with the bit already engaged in wood causes grabbing, burning, and tear-out. Always start the router away from the workpiece, let it reach full speed, then engage the wood. Always lift the bit completely out before turning off the tool.
Ignoring rotation direction undermines control and cut quality. Confirm your router’s spin direction before every cut, and feed accordingly. This simple check prevents most common routing problems.
Critical Router Safety Practices
Operating safely requires consistent attention to protective equipment and safe practices throughout every routing session. Eye protection is non-negotiable—particles flying at high velocity cause serious injuries, and safety glasses or a face shield should be worn at all times during operation. Ear protection guards against cumulative hearing damage from sustained router noise.
Maintain proper body position behind and to the side of the router, never directly behind where kickback could drive the tool toward you. Keep hands and body parts away from the bit path, and ensure your workpiece is securely clamped before cutting. Never force the router through material, and unplug the tool before changing bits or making any adjustments. These practices become automatic with consistent application, protecting you while you focus on producing quality work.
Mastering router operation takes practice, but the principles remain consistent: choose the right bit, install it properly, set accurate depth, secure your workpiece, feed against the rotation, and maintain safety awareness throughout. Start with simple edge profiling on scrap wood, then progress to grooves, joints, and decorative work as your confidence grows. The router rewards patient skill development with capabilities that elevate every project you create.
Leave a Reply