Your STIHL weed eater’s trimmer head has stopped feeding line properly, or maybe you need to swap to a different cutting attachment for the job at hand. Knowing how to take trimmer head off STIHL weed eater models correctly prevents frustrating damage to your equipment and saves you a trip to the service center. Whether you’re dealing with the AutoCut C 25-2 on your gas-powered trimmer or the tab-release system on your battery-powered FSA 56, each model requires specific techniques for safe removal.
Before attempting any trimmer head removal, always disconnect the power source—remove the battery from cordless models or disconnect the spark plug on gas units. The trimmer head contains sharp components that can cause serious injury if the equipment starts accidentally during maintenance. This guide covers every major STIHL trimmer head type, giving you the exact steps to remove your specific model without damaging threads or components.
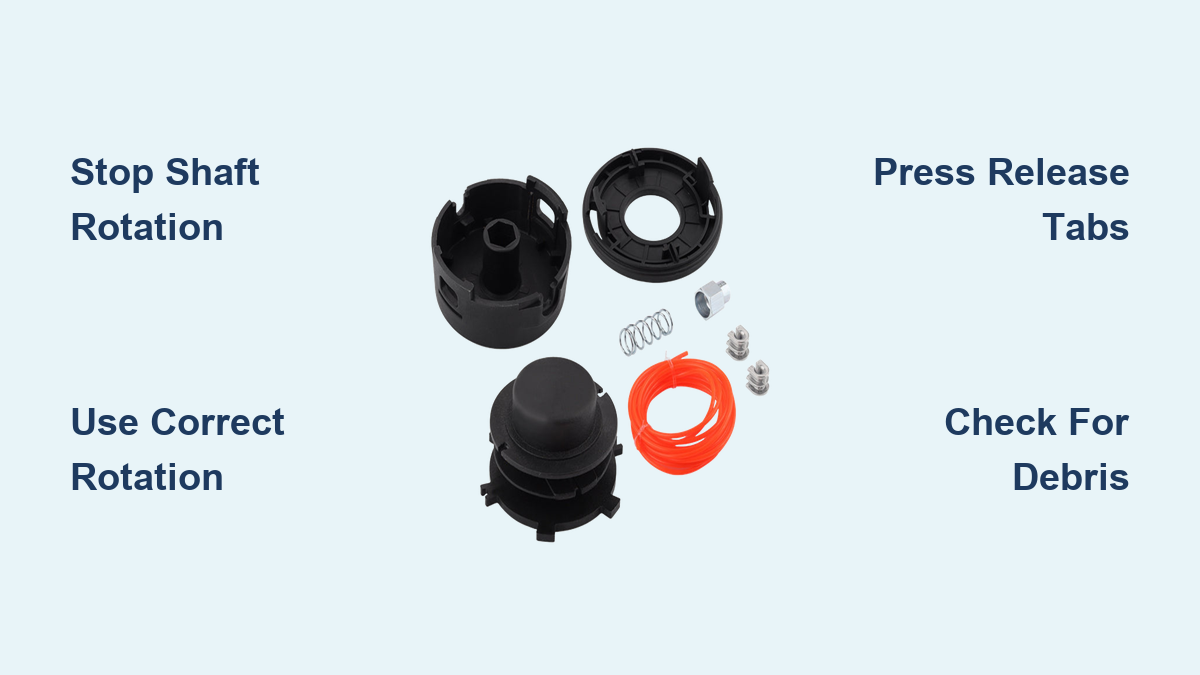
Block Driveshaft Rotation for Threaded STIHL Heads
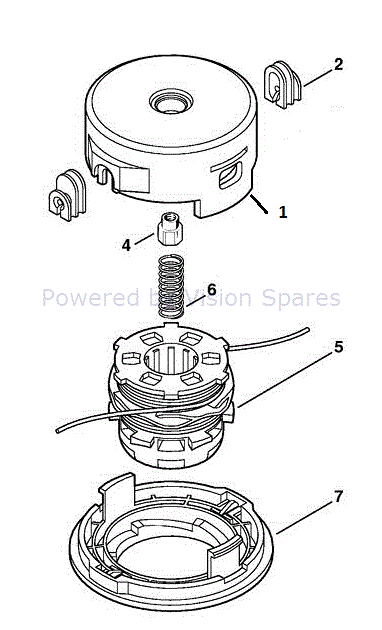
Most STIHL trimmer heads attach via threaded connections that require preventing shaft rotation during removal. You’ll need to insert the stop pin—a small metal tool included with your trimmer—into the designated hole near the head mounting area. This pin engages internal components to lock the shaft in place while you apply torque to the head.
Locate the stop pin insertion point on your specific model—typically found near the base of the trimmer head assembly. Insert the pin fully until it clicks into position. Never attempt removal without properly blocking the shaft, as this will only spin the entire driveshaft rather than loosening the head. The stop pin must remain engaged throughout the entire loosening process; removing it prematurely will cause the shaft to rotate again, forcing you to start over.
Remove AutoCut C 25-2 Without Stripping Threads
The AutoCut C 25-2 head follows standard STIHL threading principles but requires specific rotation direction for removal. After inserting your stop pin to block shaft rotation, grip the head firmly with one hand while applying clockwise rotation with the other—yes, clockwise for removal, opposite of installation direction.
Continue rotating until you feel the threads fully disengage. Do not force the head if resistance is significant; instead, verify your rotation direction. The C 25-2 uses counterclockwise threading for installation, so clockwise rotation correctly loosens it. Once the head spins freely, unscrew it completely by hand without the stop pin. Remember to remove the stop pin before setting the head aside to prevent accidentally leaving it installed during reassembly.
Pro tip: If you encounter stubborn resistance, apply penetrating oil to the threads and let it soak for 15 minutes before attempting removal again—never use excessive force that could damage the shaft.
Unthread AutoCut C 5-2 and C 6-2 Heads Correctly
The AutoCut C 5-2 model requires special attention because of its unique installation sequence that affects removal direction. Unlike most STIHL heads, the C 5-2 initially screws on clockwise for the first couple of turns before final counterclockwise seating. This means removal requires counterclockwise rotation rather than the clockwise movement used on the C 25-2.
With the stop pin properly inserted, rotate the C 5-2 head counterclockwise to loosen it. Continue until the head spins freely and can be unscrewed by hand. If you feel resistance, stop immediately—forcing it could strip the threads. The C 6-2 follows standard STIHL threading, requiring clockwise rotation for removal after proper shaft blocking.
What to do if your C 5-2 head won’t budge
- Double-check you’re rotating counterclockwise
- Inspect for grass or debris jammed between head and shaft
- Apply penetrating oil and wait 10 minutes before retrying
- Never use pliers or excessive force that could damage components
Release FSA 56 Trimmer Head Without Tools
The STIHL FSA 56 battery trimmer features a completely different tool-free head system that eliminates the need for stop pins or threaded connections. First, ensure the battery is completely removed from the unit—never attempt head removal with power connected.
Locate the two spring-loaded release tabs on either side of the mowing head assembly. Press both tabs inward simultaneously with firm thumb pressure while pulling the cap straight away from the head. The cap should release smoothly without resistance when done correctly.
Key FSA 56 removal steps:
- Remove battery from the unit
- Press both release tabs inward simultaneously
- Pull cap straight away from head assembly
- Store cap in safe location to prevent tab damage
When reinstalling, align the tabs with their slots and press firmly until you hear a distinct click indicating secure retention. Never force the cap if it doesn’t seat easily—misaligned tabs can break, requiring expensive replacement.
Remove PolyCut Blade Head Safely
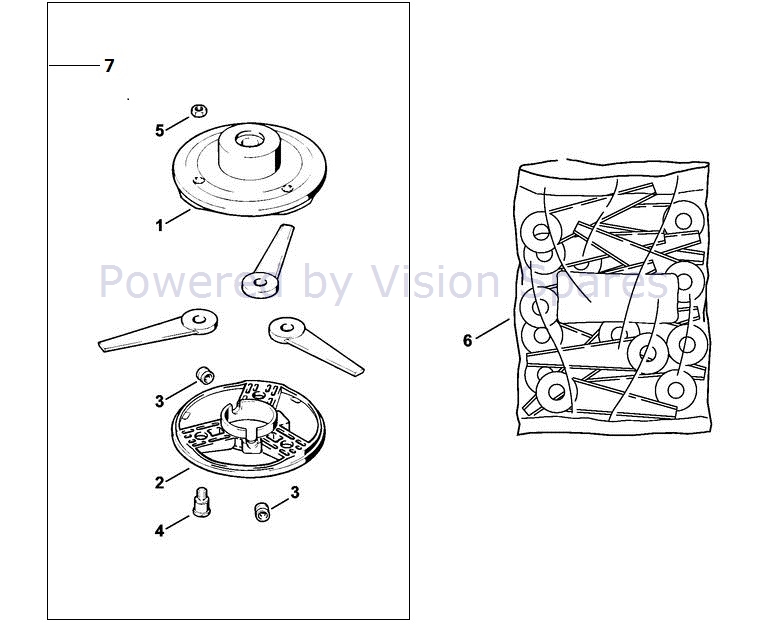
PolyCut heads use rigid plastic blades instead of nylon line and require different removal techniques. These heads secure with perimeter bolts surrounding the blade retention cover rather than threaded shaft connections.
Begin by removing the bolts that secure the blade retention cover using the appropriate socket or wrench. Keep track of any sealing or lock washers as you remove them. Once all bolts are removed, carefully lift the retention cover to expose the blades beneath.
Critical safety note: Always wear heavy-duty cut-resistant gloves when handling PolyCut blades—these rigid plastic components have sharp edges that can cause serious cuts during removal and installation.
After removing the worn blades, apply STIHL-recommended grease around the bolt holes and contact surfaces before installing new blades. This prevents corrosion and makes future removal easier. Position new blades exactly as the originals were installed, ensuring any directional indicators face the correct cutting orientation.
Extract Brush Knife Blade Assembly Properly
The Brush Knife 250 mm attachment requires careful component sequencing during removal to ensure safe reinstallation. First verify you have the appropriate deflector installed as required by STIHL safety regulations.
With the stop pin inserted to block shaft rotation, loosen the central retaining nut by rotating it counterclockwise (when facing the nut). Once loose, remove the nut completely, followed by the rider plate, thrust washer, and thrust plate in that exact sequence.
When reinstalling, reverse this order: thrust plate first against the blade hub, then thrust washer, rider plate, and finally the retaining nut. Tighten to manufacturer-specified torque values—too loose risks detachment during operation, while over-tightening can damage threads.
Troubleshoot Stubborn Trimmer Head Removal
Cross-threaded connections often prevent proper removal and typically result from improper initial installation. If your trimmer head resists removal despite correct technique, inspect the mounting area for visible thread damage or debris interference.
Common removal problems and solutions:
- Threaded heads won’t budge: Apply penetrating oil and wait 30 minutes before retrying
- Rounded bolt heads: Use a six-point socket instead of open-end wrench for better grip
- Corroded connections: Apply anti-seize compound after cleaning and before reinstallation
- Stripped tab-release mechanisms: Replace damaged caps rather than forcing removal
Never use excessive force or improvised tools that could damage your trimmer. If significant resistance continues after proper techniques, consult a STIHL authorized service center rather than risking further damage.
Maintain Trimmer Head for Easier Future Removal
Regular maintenance prevents most difficult removal situations. After each use, inspect the trimmer head for debris buildup, particularly around threads and retention features. Remove grass, dirt, and vegetation with a stiff brush—not high-pressure water that could force debris into bearings.
Apply a thin layer of STIHL-recommended grease to shaft threads before reinstalling any trimmer head. This lubrication prevents corrosion and reduces friction during future removal procedures. For equipment stored long-term, either remove the head completely or loosen it slightly to relieve pressure on threads and seals.
Pro maintenance schedule:
– After every 10 hours of use: Clean debris from head assembly
– Every 50 hours: Apply grease to shaft threads
– Before winter storage: Remove head and clean thoroughly
– Every 100 hours: Inspect for thread wear or damage
Verify Secure Installation Before Operating
After completing any trimmer head removal and replacement, thorough verification prevents dangerous detachment during operation. Confirm all components are properly installed and tightened to specified torque values. Check that retention features are fully engaged—whether threaded connections, tab releases, or bolt fasteners.
Visually inspect the head mounting area to ensure proper alignment. For threaded connections, the head should seat fully against the shaft shoulder without gaps. For tab-release systems, confirm the cap clicks securely with no play. Most critically, verify the stop pin has been completely removed—leaving it installed during operation causes immediate and severe damage to your trimmer.
Loose trimmer heads can detach at high speed, creating dangerous projectile hazards. Taking an extra minute to verify proper installation protects both your safety and your STIHL equipment investment. If you’re uncertain about proper installation, consult a STIHL authorized dealer before operating your weed eater.
Leave a Reply