Your EGO weed trimmer’s performance depends heavily on properly maintained cutting line. When the string wears down or breaks frequently, it forces you to stop mid-task and disrupts your lawn care routine. Rather than replacing your entire trimmer or paying for professional service, restringing is a simple maintenance task that takes just minutes once you know the process. This guide provides a complete walkthrough for replacing the string on your EGO weed trimmer, whether you have a bump-feed model or fixed-line system.
Learning to restring your EGO trimmer yourself saves money and keeps your equipment running optimally throughout the season. You’ll discover when replacement is necessary, how to choose the right string type, and the exact steps to follow for successful restringing. By mastering this essential skill, you’ll maintain clean edges on your lawn and extend the life of your valuable EGO equipment.
Recognizing When Your EGO Trimmer Needs New String
Physical inspection reveals clear indicators that replacement is necessary. Examine the trimmer line for fraying, nicks, or breaks along its length. If the line appears worn, discolored, or has lost its original round or star-shaped profile, it has degraded beyond optimal performance. Additionally, if you notice excessive line breakage during normal operation—more than typical wear patterns suggest—the remaining line may have become brittle from age, UV exposure, or repeated use.
The most obvious sign is significantly reduced cutting ability, where the trimmer struggles to cut grass it previously handled with ease. You may notice the line has become so short that you must extend it frequently during use, disrupting your workflow and leaving edges uneven. This constant need for extension indicates the line has worn down to a point where replacement—not just extension—is necessary for efficient operation.
Another telltale sign involves the bump-feed mechanism. If tapping the trimmer head on the ground fails to release additional line, or if the line feeds unevenly or not at all, the old line may be tangled, jammed, or depleted inside the head. In these cases, complete replacement rather than simple extension resolves the issue.
How to Check Line Condition Without Removing the Head
To assess your line condition without full disassembly, power on your trimmer and observe the cutting action. Healthy line creates a clean, consistent cutting pattern with minimal vibration. If you notice excessive vibration or the line appears to wobble during operation, this indicates uneven wear or damage that requires replacement.
Stop the trimmer and manually extend the line to its maximum length. Measure the remaining line—if less than 4 inches extends from the head when fully extended, replacement is needed. Also check for consistent thickness along the entire length; thin spots or irregularities mean the line has worn unevenly and should be replaced.
Selecting the Correct Replacement String
Choosing the correct replacement string ensures compatibility with your EGO trimmer model and optimal cutting performance. EGO trimmers typically use line with diameters ranging from 0.065 inches to 0.095 inches, depending on the specific model and power class. Consult your owner’s manual to confirm the recommended diameter for your particular trimmer, as using line that is too thick strains the motor and may cause damage, while line that is too thin breaks prematurely.
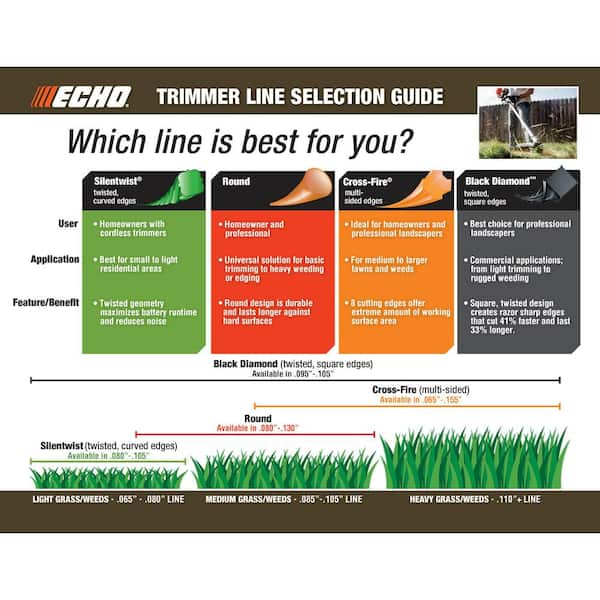
The shape of the trimmer line affects cutting efficiency and durability. Consider these options:
- Round line: Offers versatility and affordability, suitable for general trimming around established lawns
- Star-shaped or twisted line: Cuts more efficiently and lasts longer on tough weeds, though typically costs more
- Square or serrated line: Provides aggressive cutting action for heavy-duty weed control but generates more resistance
When purchasing replacement line, select a spool or length that matches your usage patterns. Heavy users benefit from bulk spools, while occasional users may prefer pre-wound replacement spools for convenience. Always verify compatibility with your specific EGO model before purchasing.
Preparing for the Restringing Process
Gathering the necessary tools before starting streamlines the restringing process and prevents interruptions. You will need:
- Replacement trimmer line in the correct diameter
- Work gloves to protect your hands
- Clean, flat workspace
- Your EGO owner’s manual for reference
Take these preparation steps before beginning:
1. Remove the battery to prevent accidental activation
2. Clear the workspace of potential obstructions
3. Take a reference photo of the trimmer head before disassembly
4. Clean debris from around the head to prevent interference
Inspect the trimmer head for any damage or accumulated debris that should be cleaned during the restringing process. Remove any wrapped vegetation, dirt, or grass buildup that may have collected around the head, as this debris can interfere with proper line feeding and rotation.
Accessing the EGO Trimmer Head
Locate the head retention mechanism on your specific model, as EGO designs vary between product lines. Most EGO string trimmers feature a quick-change head system with either a locking button or a release tab that allows the head to be removed or accessed for line replacement.
Follow these steps to access the head:
1. Press or slide the retention mechanism while turning the head counterclockwise
2. Apply steady pressure without forcing the mechanism
3. Carefully remove the head from the trimmer shaft
4. Note the orientation of any washers or springs for reassembly
Some models require pressing a pin through a designated hole to release the internal retaining mechanism. If the head resists removal, verify that you have engaged the release correctly and that no debris is obstructing the mechanism.
Removing Old Line and Cleaning Components
Clearing old line from the trimmer head prepares it for fresh string and allows inspection of the internal components. For bump-feed heads, open the spool compartment by pressing the tabs on the sides of the head and lifting away the spool cover. The old line may be partially or fully depleted, but remove any remaining fragments by pulling them free from the retention slots.
Critical cleaning steps:
– Remove grass clippings and dirt from the spool cavity
– Clean the bump feed mechanism with a soft brush
– Check for broken line fragments trapped in the head
– Verify the feed holes are completely clear
Inspect the inner spool for damage, excessive wear, or accumulated debris that should be cleaned before reassembly. Clean the spool and inner head cavity with a damp cloth, removing any grass clippings, dirt, or old line fragments that have collected over time.
Threading and Winding New String

Threading new string correctly into the trimmer head ensures proper feeding and cutting performance. Begin by measuring the appropriate length of replacement line—most EGO trimmers require between 15 and 25 feet of line. Using the full recommended length prevents premature depletion while ensuring sufficient line for extended operation.
Winding procedure:
1. Insert one end of the line through a threading hole, pulling through until 6 inches extend
2. Repeat with the second line end through the corresponding hole
3. Wind the line clockwise (following directional arrows on spool)
4. Maintain tension while winding to prevent gaps or overlaps
5. Leave 6-8 inches of line extending from each side when finished
Ensure both line ends are pulled through evenly, leaving roughly equal lengths extending from each side of the spool. Avoid crossing or twisting the lines during this process, as crossed lines tangle during operation and cause feeding problems.
Reassembling and Testing Your EGO Trimmer
Position the wound spool into the head housing, aligning any tabs or notches that guide proper placement. Some spool designs feature a keyed center that fits only one way—if the spool does not seat easily, rotate it until the keying aligns with the corresponding feature on the shaft.
Testing procedure:
1. Reinstall the battery and power on the trimmer
2. Check for smooth, quiet rotation without unusual noises
3. Gently bump the head to test the feed mechanism
4. Verify proper line extension (4-6 inches is ideal)
5. Adjust cutting height as needed for your lawn conditions
If the line does not extend properly or the head makes unusual noises, stop immediately and recheck your assembly. Properly installed string should feed smoothly with each bump and maintain consistent cutting performance.
Maximizing Your String’s Lifespan
Avoid hitting hard surfaces like sidewalks, driveways, or tree trunks, as these impacts cause rapid line wear and breakage. When trimming near obstacles, use a lighter touch or adjust your technique to minimize contact while still achieving clean cutting results.
Pro tips for longer string life:
– Store replacement line in a cool, dry location away from direct sunlight
– Alternate your trimming pattern regularly to distribute wear evenly
– Keep the line properly extended during operation
– Inspect line for damage after each use
– Clear debris from around the head after each session
Excessive vibration or unusual breakage patterns often indicate underlying problems that should be addressed promptly. Monitoring these signs helps maintain consistent cutting performance and prevents unnecessary line replacement.
When to Seek Professional Assistance
While most restringing tasks are straightforward DIY projects, certain situations warrant professional assistance. If you have followed the proper procedure multiple times without success, the trimmer head itself may be damaged or defective and require replacement rather than just new string. Signs of head damage include cracks, broken tabs, or mechanisms that fail to engage or release properly.
Persistent problems with line feeding despite correct restringing may indicate issues with the trimmer’s internal drive system or motor. Unusual noises, reduced power, or vibration during operation suggest mechanical problems beyond simple line replacement that require diagnostic expertise. If your trimmer is still under warranty, contact EGO customer service or an authorized service center before attempting repairs that might void your coverage.
Leave a Reply