
Ever found yourself standing in your yard with a weed trimmer that’s run out of line, only to realize you have no idea how to reload it properly? You’re not alone. Knowing how to load a weed trimmer correctly can mean the difference between a smoothly operating tool and one that constantly jams, tangles, or breaks line during use. This essential maintenance task takes just minutes once you understand the process, yet many homeowners avoid it until their trimmer becomes completely unusable. In this guide, you’ll learn exactly how to load a weed trimmer for optimal performance, regardless of whether you own a gas-powered model, corded electric, or battery-operated version. By mastering this simple procedure, you’ll extend your trimmer’s lifespan, improve cutting efficiency, and save money on unnecessary service calls or premature replacements.
Before you begin loading your weed trimmer, gather all necessary supplies and understand your specific model’s requirements. Taking just five minutes to prepare properly prevents the frustration of mid-process discoveries that you’re missing critical components or using incompatible line. Working on a clean, flat surface gives you better visibility of small parts and reduces the chance of losing essential pieces like springs or alignment pins. Most importantly, knowing your trimmer’s head design—bump feed, fixed line, or automatic feed—determines the exact loading procedure you’ll follow.
Gather Essential Trimmer Supplies
Before disassembling your trimmer head, collect all necessary tools in one place to avoid mid-project interruptions. Start by locating your specific model’s manual, which contains critical information about line diameter requirements and head assembly details. If you’ve misplaced the manual, most manufacturers offer digital versions online—simply search “[Your Brand] [Model Number] manual” to find the exact specifications you need.
You’ll need a fresh spool of trimmer line matching your model’s specifications, typically between 0.065 and 0.105 inches in diameter. Check your old spool or remaining line for printed diameter information before purchasing replacement. While most home trimmers use standard round line, some models require specialized square or twisted line for optimal performance. Keep a pair of scissors or utility knife nearby for cutting line to proper length, and have work gloves ready to protect your hands from sharp line edges.
Don’t overlook simple tools like a flathead screwdriver or adjustable wrench, which help with stubborn retaining nuts that have become overtightened over time. A small brush or compressed air can remove grass buildup from the spool housing, while a clean rag wipes away residual dirt and lubricant. Having these items within arm’s reach transforms what might become a frustrating 20-minute ordeal into a smooth five-minute maintenance task.
Choose the Right Replacement Line

Selecting compatible trimmer line prevents premature breakage and ensures smooth operation. Using line that’s too thick causes feeding problems and strains the motor, while line that’s too thin breaks constantly and wears out the spool mechanism faster. Most residential trimmers require 0.080-inch line for general use, but always verify your specific model’s requirements in the manual.
Line shape significantly impacts cutting performance. Round line works well for light grass trimming but requires more power to cut through thicker vegetation. Square or star-shaped line cuts more efficiently through dense growth with less vibration, while twisted or serrated designs excel at tackling tough weeds and brush at the cost of slightly higher price. For most homeowners maintaining standard lawns, standard round nylon line offers the best balance of cost and performance.
Material composition also matters—standard nylon works for typical residential use, while reinforced lines with carbon fiber or Kevlar strands resist breakage when hitting hard surfaces like rocks or fence posts. For occasional users, standard line provides the best value, but frequent trimmer operators benefit from the extended lifespan of premium materials. When in doubt, purchase a small spool of the recommended diameter to test before buying larger quantities.
Access the Spool Compartment
Opening your trimmer’s spool compartment requires understanding your specific head design. Bump feed heads, the most common type, feature a cap on the bottom that advances line when pressed against the ground. To access the spool, place your trimmer on a stable surface and press down slightly while turning the cap counterclockwise. If the cap resists turning, wrap a rubber glove or textured cloth around it for better grip—never use metal tools that can damage plastic components.
Fixed-line heads use a retaining nut secured with a wrench. Locate the nut beneath the head housing, support the head with one hand, and turn the nut counterclockwise to remove it. Some models have left-handed threads, so if standard counterclockwise rotation doesn’t work, try turning clockwise instead. Once the nut is removed, the entire spool assembly lifts out, revealing the spring and any alignment pins that must be kept track of during reassembly.
Before proceeding, take a moment to clean debris from the housing using a small brush or compressed air. Grass buildup and dirt can interfere with proper line feeding, so removing this material during each line replacement prevents future operational issues. Inspect the housing for worn tabs or damaged components that might require replacement parts before reloading your line.
Remove Old Line from Spool
Clearing old line completely prevents tangles with your new installation. Start by pulling out any remaining line wrapped around the spool—if it’s stuck or fused together, cut it into sections with scissors for easier removal. Work methodically around the entire spool to ensure no fragments remain in the winding grooves or secondary storage areas.
While the spool is empty, inspect it for wear indicators that signal replacement time. Deep grooves worn into the spool edges cause new line to slip during operation, while cracked or broken flanges compromise line retention. Check the spring mechanism beneath the spool for proper tension and freedom of movement—weak or damaged springs cause inconsistent line feeding.
Clean the line retention hole with a small pick or wire to remove grass debris that prevents new line from seating properly. This small hole frequently clogs during normal operation, so clearing it ensures your new line stays securely in place during winding. If you discover significant damage during inspection, replacing the entire spool assembly costs less than the frustration of repeated reloading attempts.
Wind New Line Correctly
Winding direction determines whether your line stays securely wound during operation. Most spools feature molded arrows indicating the correct winding direction—always follow these rather than guessing. If arrows are missing, observe the direction of any remaining old line or consult your manual. Never wind against the designated direction, as this causes the line to unravel during use.
Insert the line end into the retention hole, pulling through 6-8 inches to create the initial feed. Begin winding slowly and steadily in the correct direction, maintaining consistent tension—too loose creates air pockets that expand during use, while too tight strains the line and causes premature breakage. Wind each revolution tightly against the previous one without overlapping or crossing lines.
Stop winding when you reach the spool’s maximum capacity line, typically 1/8 inch from the outer edge. Leaving adequate space ensures proper line feeding through the head’s eyelets. Trim excess line at the retention point, leaving approximately 6 inches extending from each side of the spool for proper feeding during operation.
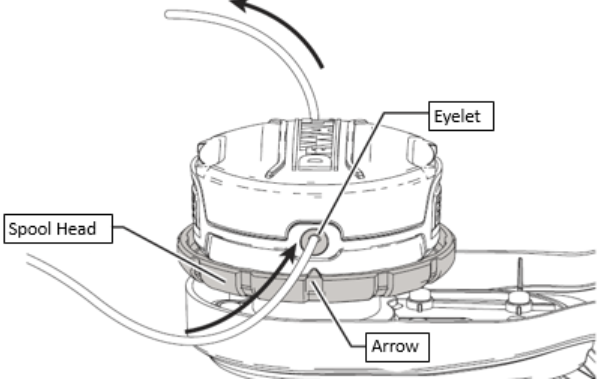
Reassemble Your Trimmer
Proper reassembly ensures smooth line feeding and prevents operational failures. Before seating the spool, thread the free line ends through the head’s eyelet holes—one line through each hole. This critical step is often overlooked and causes most post-reloading issues. Pull the line through until the spool sits flush against the housing.
For bump feed heads, seat the spool onto the central post with the spring positioned beneath it. Align any retention tabs with corresponding slots in the housing, then thread the cap clockwise by hand. Tighten firmly but avoid overtightening, which makes future removal difficult. Test the bump mechanism by pressing the cap against a solid surface—the spring should compress and release smoothly.
Fixed-line heads require reinstalling the retaining nut after seating the spool. Hand-tighten first, then secure with a wrench without excessive force. The nut should be snug enough to prevent loosening during operation but not so tight that it strips the threads or cracks the housing.
Test and Adjust Line Feed
Always test your trimmer before tackling your entire yard. Start the unit and gently bump the head against a solid surface to test line advancement. Each bump should release a small amount of line without binding or tangling. Listen for smooth rotation without wobble or unusual noises that indicate misalignment.
Check line length during operation—properly loaded trimmers maintain consistent line extension of 4-6 inches beyond the guard. If line feeds too quickly, the spring tension may be too loose; if it doesn’t advance, the spool may be wound incorrectly or the line may be binding in the eyelets. Make adjustments before extensive use to prevent damage to the feeding mechanism.
Run the trimmer at full speed for one minute to verify stable operation. Test on light grass before moving to thicker vegetation, as this reveals any feeding inconsistencies that might not appear during initial testing. Address any issues immediately while the head remains easily accessible.
Maintain Optimal Trimmer Performance
Regular maintenance extends your trimmer’s lifespan and ensures reliable performance. After each use, wipe down the head assembly to remove grass buildup that interferes with line feeding. Store your trimmer vertically in a dry location to prevent moisture accumulation in the head assembly.
Inspect line condition regularly, replacing it before it becomes dangerously thin or frayed. Keep spare line and a replacement spool on hand to avoid trimming delays. For gas models, follow proper winterization procedures including fuel stabilization to prevent carburetor issues during storage.
Learning how to load a weed trimmer properly transforms what many consider a frustrating chore into a quick, routine maintenance task. With practice, you’ll complete the entire process in under ten minutes, ensuring your trimmer operates at peak efficiency throughout the growing season. By following these steps consistently, you’ll maintain clean, professional-looking edges on your lawn without expensive service calls or premature equipment replacement.
Leave a Reply