
Ever wonder why your weed wacker slices through stubborn weeds but stops dead when it hits a rock? Understanding how do weed wackers work transforms you from a casual user into a master of precision lawn care. These indispensable tools solve a frustrating problem: getting clean edges where mowers can’t reach, without the backbreaking work of manual trimming. The secret lies in physics and engineering working together to turn simple nylon line into an effective cutting tool. By the end of this guide, you’ll know exactly what happens when you pull that starter cord or flip the switch, how different power sources affect performance, and why your trimmer behaves the way it does during operation.
Most homeowners don’t realize their weed wacker relies on centrifugal force—the same principle that keeps water in a bucket when you swing it overhead. When the cutting head spins fast enough (typically 5,000-10,000 RPM), the flexible nylon line extends outward and becomes rigid enough to slice through vegetation. This ingenious solution creates a lightweight, affordable alternative to blades that would require constant sharpening and pose greater safety risks. Whether you’re using a gas-powered workhorse or a quiet electric model, the fundamental cutting mechanism remains remarkably consistent across all designs.
Power Source Mechanics: Gas vs. Electric vs. Battery

Why Gas Models Deliver Maximum Cutting Power
Gas-powered weed wackers use small two-stroke or four-stroke engines that generate significant torque for tackling thick brush and dense weeds. Two-stroke engines require premixed fuel (gasoline and oil), while four-stroke models have separate oil and fuel compartments—making refueling simpler but adding weight. When you pull the starter cord, the engine ignites the fuel mixture, creating controlled explosions that rotate the crankshaft. This rotational force engages a centrifugal clutch only when engine speed reaches operating threshold, preventing the cutting head from spinning at idle.
The real advantage of gas models emerges when cutting through stubborn vegetation. That extra torque allows the spinning line to power through thick weeds without stalling—a critical feature for professional landscapers covering large properties. However, this power comes with trade-offs: heavier weight (typically 10-15 pounds), higher vibration, louder operation (90-100 decibels), and the need for regular engine maintenance. If you’re clearing overgrown lots or maintaining commercial properties, gas power remains unmatched for continuous heavy-duty work.
Electric and Battery Models: Simpler Operation Without Compromise
Electric corded and battery-powered weed wackers deliver instant power without the maintenance headaches of gas engines. When you flip the switch on a corded model, household current flows through the extension cord to an electric motor that spins the cutting head almost instantly. Battery models work similarly but draw power from lithium-ion packs that have dramatically improved in recent years—some now matching entry-level gas performance. Both options eliminate fuel mixing, primer bulbs, and choke adjustments, making them ideal for homeowners with smaller yards.
The operational difference becomes apparent during use: electric models reach full speed in under a second, while gas engines need warm-up time. Battery life has improved significantly, with modern 40V+ systems providing 30-45 minutes of runtime on a single charge—enough for most residential properties. Though they lack the raw power of gas models for heavy brush, today’s electric and battery trimmers handle standard grass and weed trimming with quiet efficiency (typically under 85 decibels). The absence of exhaust fumes also makes them safer for enclosed spaces like fences and hedges where gas fumes could accumulate.
Cutting Head Physics: How Spinning Line Becomes a Blade
The Centrifugal Force Principle That Makes Trimming Possible
Your weed wacker’s cutting ability depends entirely on centrifugal force—when the head spins fast enough, the flexible nylon line extends outward and becomes rigid. At operating speeds (5,000-10,000 RPM), this transforms the limp line into an effective cutting tool capable of slicing through vegetation. The line’s outward extension creates a cutting diameter of 12-18 inches, depending on model and line length. This physics principle allows weed wackers to cut without traditional blades, reducing weight and eliminating dangerous sharp edges.
Different line types optimize this effect for specific tasks: standard round line (0.065-0.095 inches diameter) works well for general trimming, while square or star-shaped line cuts more aggressively through thick weeds. For heavy brush, reinforced lines with embedded fibers maintain rigidity longer. The line-limiting blade on your safety shield trims excess line to the optimal length—too short reduces cutting diameter, while too long causes tangling and inefficient cutting. Understanding this balance helps you choose the right line for your specific vegetation challenges.
Bump-Feed vs. Automatic Line Advancement Systems
Most consumer weed wackers use bump-feed heads where tapping the head against the ground releases more line through centrifugal force. When you “bump” the head, an internal mechanism disengages, allowing springs to push additional line out as the head spins. This simple design requires no electricity or complex parts but demands user intervention when line wears down. For best results, release throttle pressure before bumping to prevent line from unraveling completely—many users make the mistake of bumping while at full throttle, causing line jams.
Professional-grade models often feature automatic feed systems that sense line length and dispense more as needed. These heads use centrifugal weights or spring-loaded mechanisms that detect when line has worn down, automatically advancing replacement line without stopping work. While more convenient, automatic systems can sometimes overfeed line, causing tangles if vegetation is too dense. Whichever system you use, regularly checking line length before starting prevents mid-job frustration—keep a spare spool in your gardening toolkit for quick replacements.
Safety Shield Design: More Than Just Debris Protection
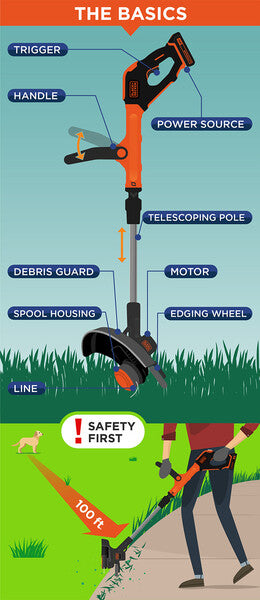
How the Shield Prevents Injuries and Optimizes Cutting
The safety shield on your weed wacker serves three critical functions beyond basic debris deflection. First, it creates a physical barrier between the spinning line and your body, preventing accidental contact that could cause serious lacerations. Second, it contains flying debris—rocks, sticks, and vegetation fragments—that the line would otherwise throw at dangerous velocities (up to 150 mph). Third, the shield’s line-limiting blade trims excess line to the proper length, ensuring optimal cutting performance without tangling.
Most users don’t realize the shield’s angle affects cutting efficiency. When positioned correctly (typically with the flat edge parallel to the ground), it creates a clean cutting plane that produces professional-looking edges. Tilting the shield upward slightly helps cut standing vegetation, while pointing it downward risks gouging the soil. The shield must be properly secured—loose shields vibrate excessively and fail to contain debris effectively. Always check shield mounting bolts before use, as vibration can loosen them over time, compromising both safety and performance.
Operational Techniques That Maximize Cutting Efficiency
Proper Body Position and Movement for Clean Edges
Holding your weed wacker at the correct angle makes the difference between clean edges and ragged, uneven trimming. For standard lawn edging, position the cutting head parallel to the ground with the shield facing away from the area you want to keep pristine. Move the trimmer in smooth, sweeping motions from side to side—never force it through vegetation, as this strains the motor and causes line breakage. Keep your arms slightly bent with elbows away from your body for better control and reduced fatigue during extended use.
The most common mistake beginners make is holding the trimmer too vertically, which creates uneven cuts and excessive vibration. Instead, tilt the unit 15-20 degrees toward the area you’re trimming, letting the spinning line do the work with minimal pressure. When edging along sidewalks or driveways, position yourself so flying debris shoots away from the hard surface to prevent pitting and damage. For best results in tight spaces, rotate your wrist rather than bending at the waist—this maintains consistent cutting height while reducing back strain.
Maintenance Essentials for Reliable Performance
Weekly Checks That Prevent Mid-Season Breakdowns
Perform these three critical checks before every use to avoid frustrating stoppages: first, inspect the trimmer line for wear and replace if frayed or shorter than 6 inches; second, clear debris from the cutting head housing that could restrict line movement; third, verify the safety shield is securely attached and properly aligned. Gas models require additional checks—ensure the air filter is clean and the fuel mixture is fresh (older than 30 days degrades performance).
Line replacement deserves special attention: using the wrong diameter line causes poor cutting or motor strain, while improper spooling leads to tangles. Always follow your model’s specific line loading pattern—most require winding line in the direction indicated by arrows on the spool. Keep line ends properly trimmed to the length specified in your manual (usually 6-8 inches) using scissors rather than the line-limiting blade for clean cuts. Storing your weed wacker with empty line spools prevents line degradation from sun exposure.
Troubleshooting Common Performance Issues
Why Your Trimmer Loses Power Mid-Task (And How to Fix It)
When your weed wacker suddenly loses cutting power, check these three common culprits before assuming engine failure. First, inspect the line length—worn-down line reduces cutting diameter and efficiency. Second, examine the drive shaft for kinks or separation, especially in curved-shaft models where flex points weaken over time. Third, clean the air intake vents blocked by grass clippings that restrict cooling airflow. Gas models often suffer from clogged fuel filters or old gasoline that prevents proper combustion.
For electric models losing power, check your extension cord first—using undersized cords (below 16-gauge for runs under 50 feet) causes voltage drop that starves the motor. Battery models frequently experience reduced runtime from improper charging habits; never store batteries fully discharged, and avoid exposing them to extreme temperatures. If your trimmer vibrates excessively, inspect for loose components or an unbalanced cutting head—continued use in this condition damages internal gears and shortens tool life.
Understanding how do weed wackers work transforms routine yard work into precise landscaping. The physics of centrifugal force turning flexible line into a cutting tool, combined with proper technique and maintenance, ensures clean edges without constant frustration. Remember to match your power source to your property size—gas for large lots with heavy brush, electric for smaller yards where noise matters. Most importantly, respect the safety shield’s critical role in protecting you from high-speed debris. By applying these insights, you’ll maximize cutting efficiency, extend your tool’s lifespan, and achieve professional results that make your lawn stand out in the neighborhood.
Leave a Reply